One of the most problematic areas of making your own document images is the eternal bending over to secure the ‘best’ shot with your camera phone. First, there’s the perfect placement of your body, ensuring you keep out of shot, as you manoeuvre your phone to capture the part of the page that you need (probably all of it). All the while keeping the image in focus. Next, there’s avoiding your own shadow, so light levels are as uniform as possible across the page (well – good enough to read the text). And just when you’ve cracked it, you need to keep perfectly still, avoiding any kind of shake, while you take the ‘shot’. Leaning-over precariously for what seems like hours on end just isn’t conducive to a productive research trip, nor is it good for your back.
There are, however, ways of ameliorating this problem. Some repositories will assist the researcher by providing static tripods with a camera attachment (I assume it might be possible to find a phone attachment with the relevant fitting, but I haven’t checked this out). More reasonably though – it’s a case of taking your own phone holder. Over the past couple of years, a plethora of phone holders have appeared on the market, largely to cope with working from home. But choosing one for archival purposes isn’t exactly straight forward. For this reason the Capturing the Past team have tested a handful of holders – in the main to get you thinking about the features that are important to your own research practices.
For this test, the team chose five phone holders. On the whole, they were unbranded and widely available. The phone photo button was operated by using the ‘volume +’ button on a set of ear phones, in this instance, plugged into the USB C port ( same as the charging port) since I don’t have a separate ear phone socket. If you want to use this method on your own phone then you will probably need to adjust your settings. Using the earphone also helps reduces shake when the photo is taken. The white cable of the ear phones can be seen in the images.
NOTE: When planning your archival research trip you should check that the repository permits the use of phone holders or tripods – a quick email might be necessary if this isn’t apparent from their website. If you go on speck, then always seek permission before using any sort of device in the reading rooms. Some repositories will not permit the use of tripods or phone holding devices. In any case you will need to sort out your permission to photograph documents (usually by paying a fee) – double-check then.
Selfie Stick Tripod [K10], TVACHE Extendable Bluetooth selfie stick with wireless remote
Price: £11.04 Weight: 137g Folded size: 21 x 5cms
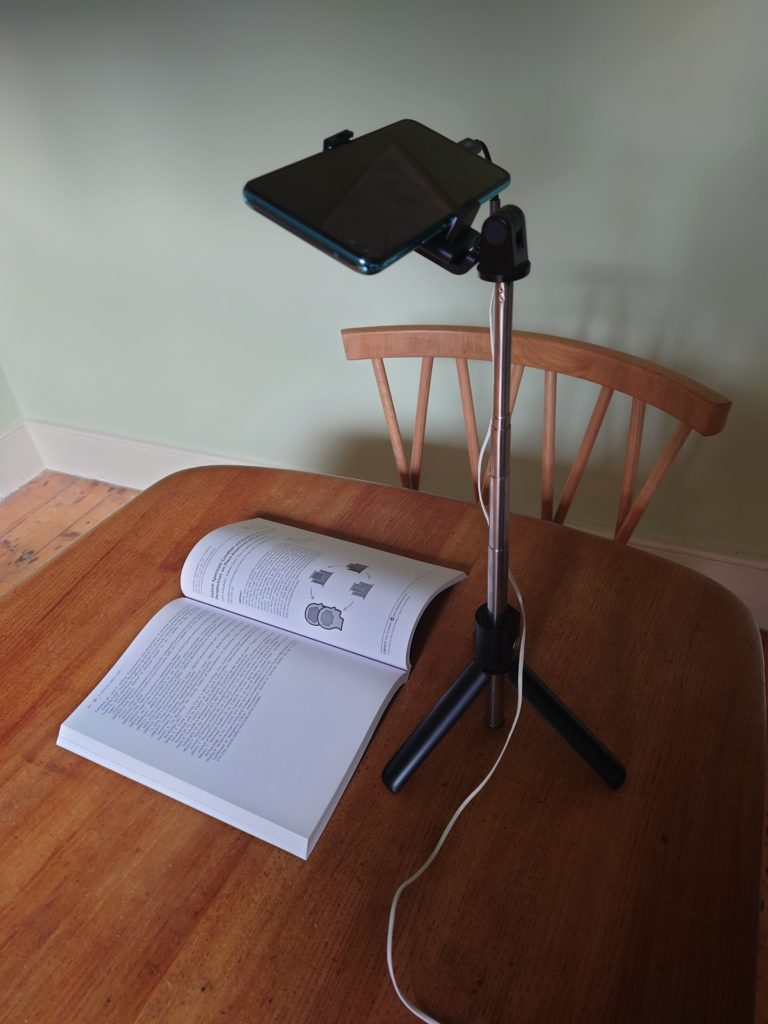
This was the cheapest holder we tested, it was light and folded to a pleasingly small 21cms. It easily fitted into my rucksack, and I could have popped it into the pocket of my outdoor coat. Set up was simple, three small feet folded out from the stick allowing it to sit on a surface next to the ‘document’. The phone holder unfolded allowing the phone to be clamped in place and the telescopic stick varied its height above the document. The feet, however, were somewhat flimsy and not very stable, especially when the phone was in the holder. It was easy to rotate the phone holder to point downwards with some nice firm clicks, although fiddly to clip the phone into the spring-loaded clamp. I was entirely unable to discover how to taking photos with the remote and resorted to using the USB C port on my phone and the volume + button on my ear phones. More fundamentally, however, the phone did not extend over the test ‘document’, and I was unable to take a shot of the whole page. If you extended the height of the phone, then the tiny tripod just keeled over, crashing to the table taking the phone with it. This would probably damage a document if used in an archive!
Verdict: Not recommended – avoid
FAPPEN, mobile phone holder, 360° flexible articulating long arm clamp, bracket mount
Price: £12.99 Weight: 523g Folded size: 45 x 18cms
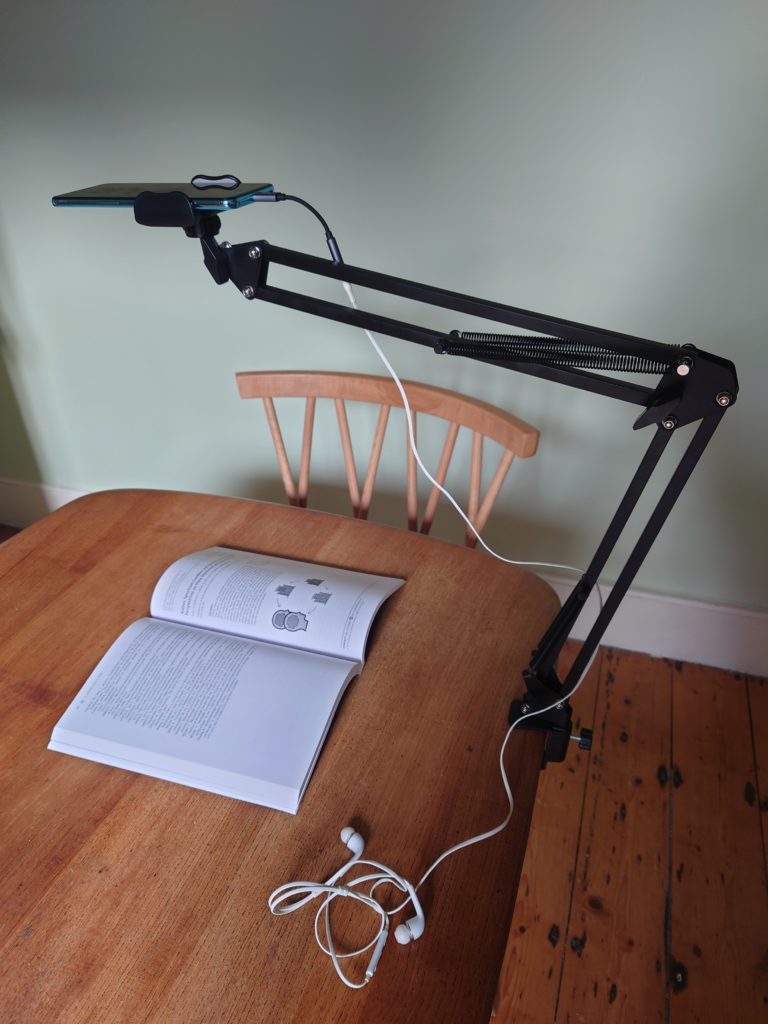
The next holder was an altogether more solid affair, looking very much like a phone holder screwed to the end of an Anglepoise table lamp. Initially, some small assembly tasks were required to get the holder up and running. This required pushing the table clamp into the lower slot, and with a bit more heft, fixing the phone holder to the ball joint at the other end. The holder clamped the desk edge using a simple G-clamp – this would only become a problem if the desk design was such that it was either too deep or had no lip. The phone fitted fairly easily into the spring-loaded phone clamp, although again this was a little fiddly. Adjusting the phone, so the main camera pointed downwards was simple enough, leaving the screen accessible for checking the relevant section of the document was in shot and the image sharp. The ball joint permits you to rotate the phone, allowing both portrait and landscape photos. The height of the phone (and thus the field of vision on the camera) was easily adjusted, with a maximum distance between the phone and desk approximately 59cms.The arm also reaches well across the surface of the desk, at a maximum of 38cms from the edge of the desk. The holder seemed sturdy and the ability to tighten the joints was useful, as well as reassuring. It folded down to 45cms by 18cms, allowing it to fit into my modestly sized rucksack (38cms). However, it does protrude through the top zip, necessitating a waterproof covering in case of inclement weather. The holder is excellent value for money at £12.99 and is reasonably light (523g).
Verdict: definitely a runner
Lamicall, LS 04 gooseneck mobile phone holder, flexible 360° holder with a long arm clamp bracket mount
Price: £16.99 Weight: 362g Folded size: 30 x 15 x 15cms
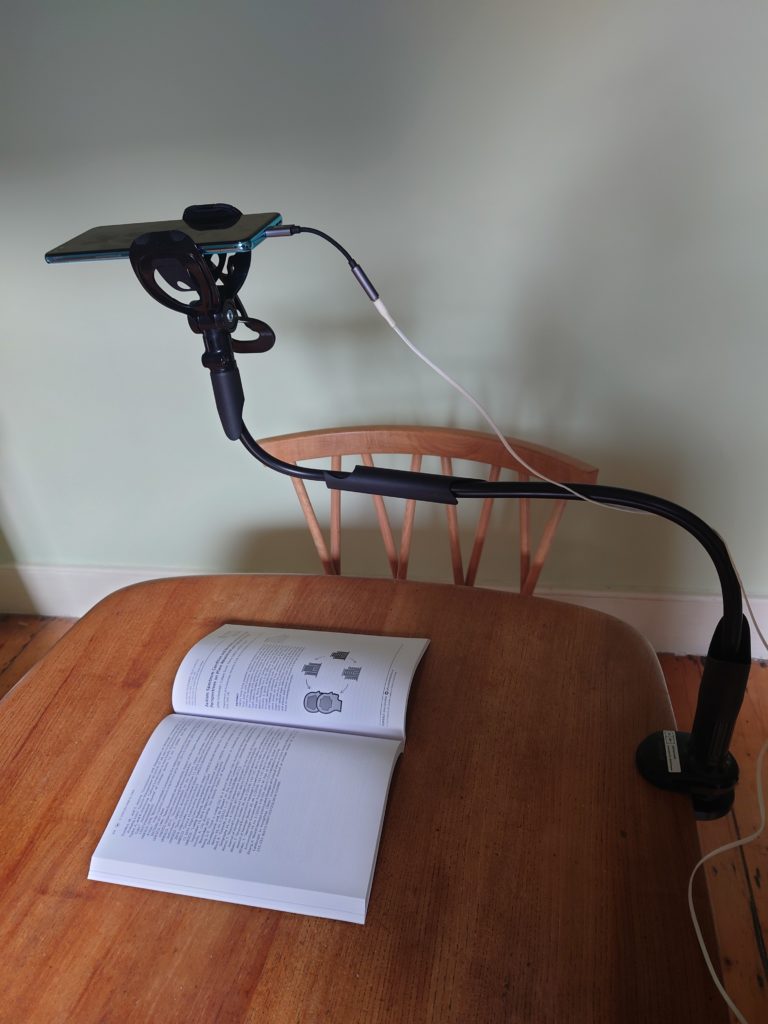
The Lamicall LS 04 gooseneck phone holder is another that uses a table clamp. I found this clamp less fiddly to set up, with the turning action aided by a comfortable hand grip at the top of the clamp – none of the fiddling about with tiny handles. The holder is manoeuvred into position by bending the very thick plastic-coated wire into the required position. The phone clamp is easy to use and resembles a large hair claw, with the phone supported on either side by cushioned pads (fingers are no longer in peril of being cruelly nipped by the spring-loaded action prevalent in most other clamps). At the end of the session the holder was neatly bent round to 30 x 15 x 15cms to fit into my rucksack with no problem. The only real issue with this holder is its springiness, touching the photo button, even with the lightest of touches, causes it to gently bounce up and down, making blurriness in the resulting images a likelihood. For this reason I used my headphones to take the photo. Weight is a very reasonable 362g and the price a modest £16.99.
Verdict: ease of use is a highlight here
Tripod stand, 160 cm floor stand for tablet with 360° rotating iPad mount on gooseneck attachment , and additional phone mount.
Price: £32.99 Weight: 1175g Folded size: 50 x 20 x 8cms (carry bag size)
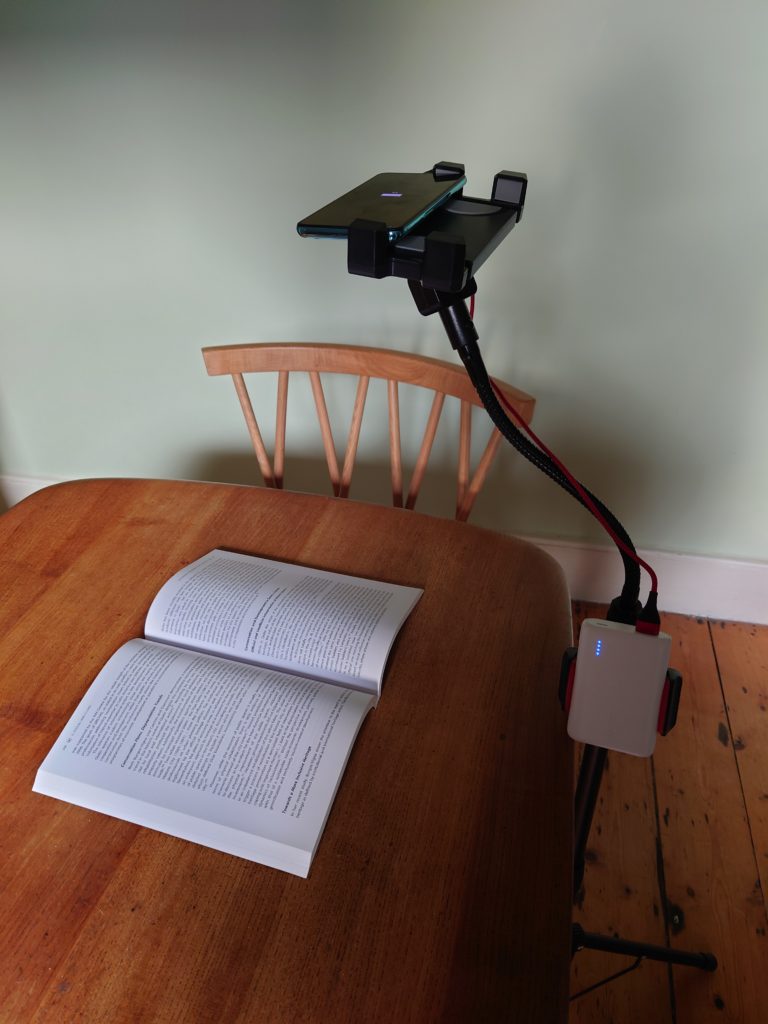
Clamping a phone holder to a desk is not always possible, however, a floor-standing tripod provides a neat solution. This simple multi-part tripod stand with a gooseneck holder seems to fit the bill. The tripod is easily assembled; the feet are spread and clamped into place and extensions rods are added for height, these are clamped and tightened into place. The gooseneck with a tablet holder is screwed into the last rod. The tablet holder works equally well with a phone held landscape, although the phone needs to be offset in order to allow the camera to point downwards towards the document. The holder can be moved horizontally in order to level the phone according to the position of the gooseneck. The gooseneck is fairly firm and stays in place with little or no springy movement. The other holder supplied with the set is a more conventional spring-loaded phone holder. The phone holder can be either clipped to the upright tripod or onto the gooseneck. This is a very simple process as the fixings are supplied with several settings to accommodate differing locations. In the set-up shown, I have used the tablet holder for the phone, with earphones to take the picture. The slightly smaller phone holder is used for a spare power pack – taking photos rapidly eats into the phone’s battery. The tripod easily disassembles and fits into the carry bag provided (50 x 20 x 8cms). However, I was unable to fit the second holder in with the rest of the pieces, making me think I was bound to lose it very quickly. The bag seems shower-proof (although not tested) so it matters less that it wouldn’t full fit into my rucksack. It’s a little heavier than the other holders at 1175g, although still modest. The same with the price at £32.99, which is pretty good given the whole package (tripod, extension poles, gooseneck, two holders and a sturdy carry bag).
Verdict: reasonably good value, good alternative to table clamp
Digistick – home made, table clamp phone holder
Price: approx. £5 Weight: 215g Folded size: 28 x 8 x 5cms
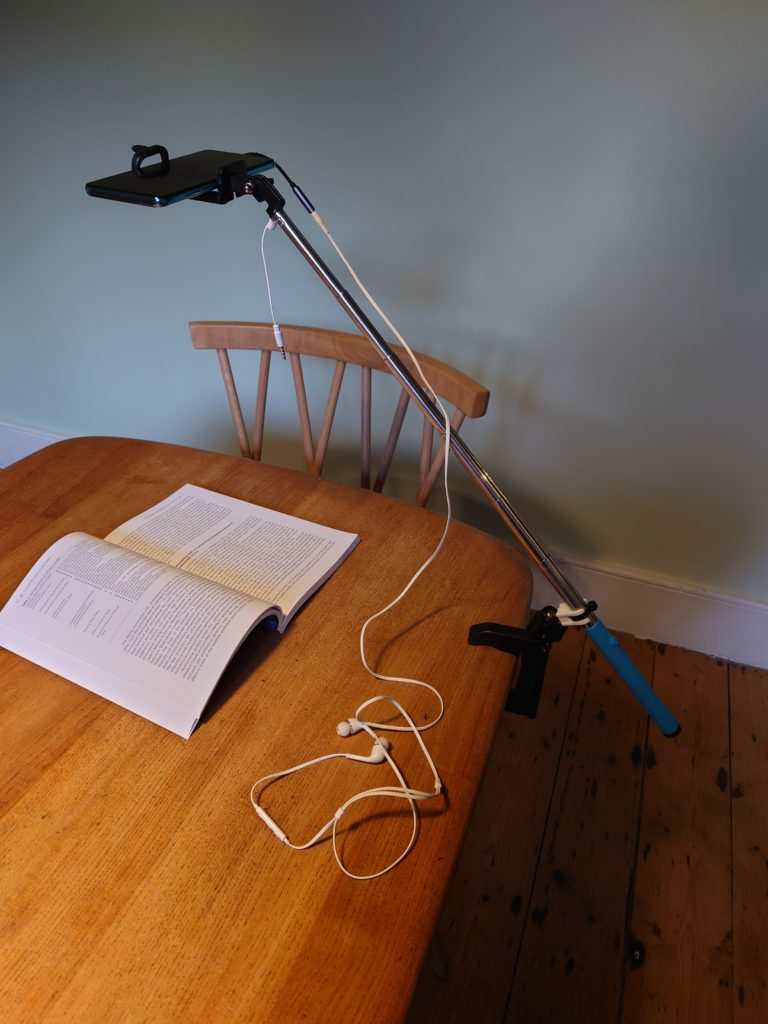
The final phone holder was made by members of the team from cheap readily available items, found locally, or easily available on the internet. It cost less than £5 and was put together using a plastic G-clamp, a telescopic selfie-stick from a discount store (yes, that’s Poundland for those of you in the UK), a domestic water pipe clip and a cable tie. The clamp is easily screwed to a desk top and would work reasonably well if the desk top was quite thick, the double ball joint is then fixed in an upright position with the selfie stick at 45°. The stick is easily unfurled, and the phone holder flipped over until it sits horizontally – a final tightening of the chunky screw heads help it stay firmly in place (this will need to be done again once the phone is added). The phone holder is spring loaded and has the same sharp action as the others tested. There is a connector which can be inserted in to phone jack so the button on the end of the stick can be used to take pictures – after changing the settings on my phone this worked well but the ear phones were probaly more convenient. It’s a bit fiddly to fold down but it easily fits into my rucksack and is very light weight. The disadvantage is that you will need to make it your self – more recently we’ve had some difficulty in getting reliable cheap G-clamps.
Verdict: works well (even if I say so myself)
[1] Thanks to Ben [Jackson] for reminding us that things only need to be ‘good enough’ for the job in hand – they don’t need to be perfect. For some more digital ‘good enough’ see, Dan Cohen, ‘The Perfect and the Good Enough: Books and Wikis’. Dan Cohen (blog), 21 June 2006. https://dancohen.org/2006/06/21/the-perfect-and-the-good-enough-books-and-wikis/. [accessed 19 Jan. 2022].


Leave a Reply