

There are lots of steps that can be taken to make sure that your module content is digitally accessible to your students. From headings and font colours to tables and alternative text, it can feel like there is a lot to keep track of. This is where the Canvas Accessibility Checker can come to your aid. This tool will scan through your pages as you edit them, checking for any content that is not digitally accessible and highlight these to you as you go.
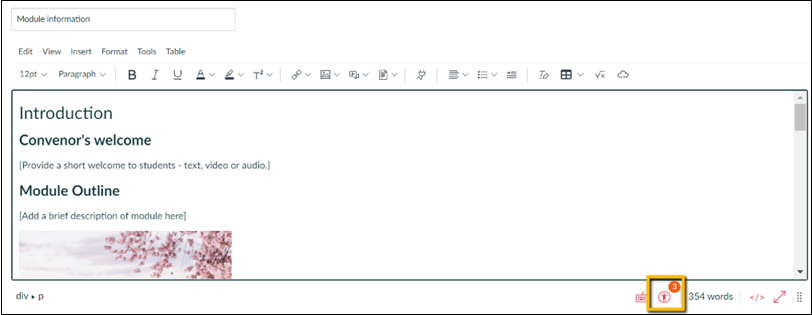
When editing your Canvas pages you will see a small icon at the bottom right of the editor. You may also see a small notification flag within this, flagging up x number of accessibility issues within your page:
Once you click this icon you will be presented with a list of the issues within your page and the accessibility check will walk you through how to fix these. For example if you have added an image to your page but have not included any alternative (alt) text to describe it Canvas will prompt you to enter your descriptive text or allow you to mark the image as a ‘decorative image’ (one that is purely used for decoration and does not add any further information to the page). You then click ‘Apply’ to confirm this change, then ‘Next’ to move on to the next issue and that accessibility flag is then removed from your page:

If you would like further information about why you need to make a specific change or what Canvas is asking you to do click the question mark icon next to the issue that has been raised and Canvas will provide you with an explanation and a link to further information.
Where the Accessibility Checker is perhaps most useful is when creating tables. When a table is first created (for guidance on how to create a table in Canvas see: How do I insert a table using the Rich Content Editor as an instructor?), by default it is not accessible as no headers or captions have been added. These steps can be completed very quickly by using the checker to walk you through this process. You’ll first be asked to provide a caption for your table to give some context to help students understand the content. You can then define the headers for your table to provide further structure.
Not only does this make it easy for you to make your table accessible, it also helps you to think whether a table is the appropriate format to present your content. Tables should be used to present data, not as a means of formatting your page.
It is important to remember that although this tool is helpful, it is not foolproof. You will still need to use your judgement and knowledge of digital accessibility when making changes to your content. For further information about digital accessibility please visit Technology Enhanced Learning’s digital accessibility pages to find out more about accessibility needs, useful tools, best practice for creating learning materials as well as how to check your content. You can also contact tel@sussex.ac.uk if you would like to discuss any of this with your Learning Technologist.
