Judith Good, Professor of Interaction Design and Inclusion, runs a joint third year and Masters module titled ‘Technology Enhanced Learning Environments’ at the University of Sussex. We spoke to Judith to learn more about the module and find out what Sussex students have been creating.
Can you tell us about the module?
So the module is called ‘Technology Enhanced Learning Environments’. It’s an optional module, which is nice because the people who take it tend to have a genuine interest in the topic. Although it’s in Informatics, it’s not really a technical module. I don’t teach any technology, I sort of make the assumption that students can go out and learn their own prototyping tools.
We do a lot on theories of learning. A few students may have a Psychology background but most don’t, so we cover how people learn, the main theories of learning, we look at theories of motivation, how to do learner-centred design and things like that. So it’s looking at the issue of technology for learning from a different perspective. One of the things that I really encourage students to do is to use the theories they learn about to reflect back on their own learning and their experiences. I also ask them to try to identify a learning experience that stood out for them, whether it was in school or any other context. By looking at these “meaningful learning experiences”, students can start to analyse them from the perspective of theories of learning and motivation, and then ask themselves how, or even whether, it’s possible to distill the positive aspects of those experiences into a digital learning environment. It’s fascinating, and I have to say selfishly I love reading about people’s experiences, and why those experiences had a particular meaning for them, because I think it helps us as educators as well.
What is the assessment that students have to complete?
The main assessment is a portfolio, I leave it completely open-ended: students have to design a prototype of a learning environment to teach something to someone, which usually terrifies them no end. However, we do this as an iterative process, so all the way through the term we have exercises to brainstorm ideas, think about topics in more depth, and understand their target audiences. What I try to do is to encourage students to think about something that, in their opinion, is taught badly and could perhaps be taught in a better way. Alternatively, they might try to really push the boat out in terms of technologies, and to think about how technologies could be used to transform the way a particular subject is taught.
So we work through the design process together, and every week students have an exercise that aims to help them take their ideas further, to create various prototypes, and to get feedback from their peers and from me. Finally, at the end of the module, we have a sort of Science Fair presentation so that everyone gets to see everyone else’s work and try everything out. What I have them do then is write that up in a reflective report, and what I try to stress is that I really want to see them take some risks in terms of what they design. Even if it doesn’t completely work, or they look back and think ‘that was really not a good idea’, as long as they reflect on it and describe what didn’t work, what they learnt and what they would do differently, then they will get a good mark. I’m trying to encourage them to be adventurous, and sometimes that’s quite scary.
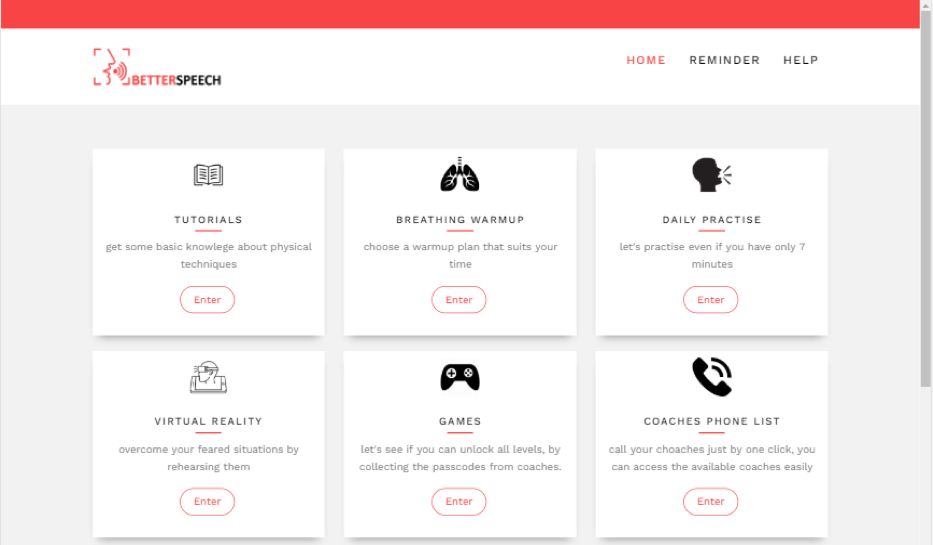
Better Speech
What makes a good learning environment, what do you look for?
For me, the first thing I look for is a justification for why it should even be there. There are literally thousands of learning apps out there already, and the last thing I want to see is, I don’t know, yet another tablet based game to teach vocabulary through matching pictures to words. I’m not saying that’s a bad thing, but it already exists. So I really want to see students think more deeply about how you can use technologies in new and innovative ways. And especially, to think about what the technology can buy you. So I’m less interested in seeing them create something that could be done just as easily without technology, and to ask themselves instead, ‘What is it about this particular technology that has the potential to transform learning?’. And so for me a good project is not necessarily the one that’s the most beautifully designed, but the one that has the best rationale for why it should exist in the first place, even if the student didn’t quite get to the point of having it fully realised.

e-natomy
I’m sure there’s lots of great projects that students have created, but what are some of the most interesting projects that you have seen?
Quite a few years ago I had a group of students who did something called Digicrafters (www.digicrafters.co.uk). They were interested in introducing children to physical computing using things like Arduino kits, and Makey Makey, which had just come out. They essentially created a series of little projects (‘Bleating Binary Bananas’, ‘Glowing Gremlin Eggs’), with associated technology kits and instructional videos about how to make them. With the Maker movement, initiatives like this have become much more mainstream, but this project is still stands out for me. The students really thought about their audience, and about how to make the topic engaging and playful, and the result was very beautifully done. That was excellent.
This year I had a student who was an artist who wanted to create an online environment for who need to access 3D anatomy models while they are drawing or sculpting. He also wanted people to be able to access the underlying skeletal and muscular structures of these models. He designed a fantastic environment which allowed you to effectively ‘peel back’ the layers of skin and muscle on animals or humans and better understand their structure. On the way to developing a final prototype, he also designed some really lovely paper prototypes that allow him to test his ideas on fellow students before creating the final version.
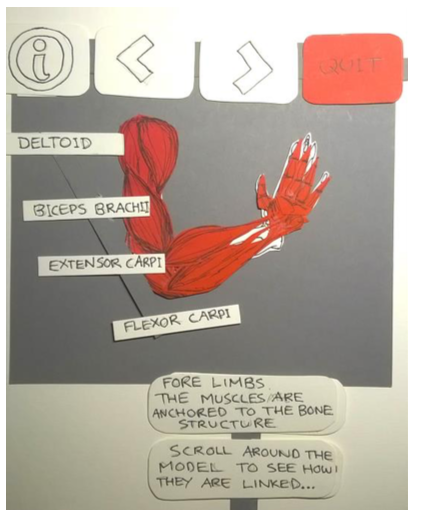
e-natomy paper prototype
And then I had a student who wanted to create an app for people who stutter. She was part of an existing programme where people attend face to face courses, but she was finding that between courses, people’s speech declines and it takes daily work to maintain progress. So she looked a lot at motivation, and specifically, how do you motivate people to do something that has a real psychological element to it, a real fear element? How do you create an environment that’s positive and supportive, that helps them to learn these techniques and practices and to want to do that? So that was really nice as well, and the student went on to develop the app even further as part of her Master’s dissertation project.
How have you found teaching the module?
For me the most rewarding thing is really getting students to reflect. I say to them at the beginning of the module that I want them to look critically at every learning situation they encounter, and to ask themselves what’s happening there, and what are the assumptions about how people learn? And I think the most positive thing for me has been hearing personal accounts of students who, in some cases, have experienced education which was really not positive, even to the point of them dropping out of school, and then suddenly coming to the realisation of ‘I understand why this environment was not supportive for me and I understand that I love to learn but this didn’t work for me. Now I know why, and now I know that I can carry that forward in a situation where I want to teach something to someone else. I’ve got a much better understanding of myself as a learner and the process of learning’. That I find really, really rewarding. I want people to come out not with the technical skills to create a learning environment, but with a real understanding of what it means to learn, and how they might best support that.