


If you’ve attended any TEL training recently, you’ll have heard us mention digital accessibility. This means making sure online teaching materials are usable for students with disabilities or specific learning needs. This year sees the introduction of new legislation governing accessibility of websites and mobile applications for publicly funded institutions, including universities, so it’s important to make sure that the digital content of our modules meet the necessary requirements.
As mentioned in our previous blog post we’ve developed some guidance to help you make your module sites accessible. I’d encourage you to look at these. In this post I’ll present a suggested workflow for making sure your module is accessible.
I’ll look at a typical module, based around a number of Canvas pages, including a homepage and several topic pages, one for each week. These pages include text, pictures and one or two videos. The module also includes links to PowerPoint slides, handouts in Word and PDF format and a reading list.
Step 1. Check the checklist
Before you start, it is a good idea to get a basic idea of what to look out for. We’ve summarised this in four key design principles:
- Structure your content
- Provide text alternatives for video, audio and images
- Use of colour
- Use descriptive text in links and headings
These principles apply across all of the formats mentioned above (Canvas, Word, PDF…). You can read more about these on our accessibility Create page. To make things easier, we’ve created a list of Do’s and Don’ts to check.
If this all sounds alien to you, the good news is that we’ve made sure these principles are baked-in to your School module templates. So as long as you use your school template you shouldn’t have to worry about the main module home page, assignment information and weekly/topic pages (if the template includes them).
Step 2. Review additional Canvas pages, Word documents and PDFs
For content beyond the core template pages the key thing to be concerned about is the structure. Alternative (alt) text for images (and for Canvas pages, colour contrast) should be picked-up using an accessibility checker which we’ll come to in a bit.

Word, PowerPoint and PDF checkers won’t test for appropriate colour contrast but if you keep to the combinations used in the templates you should be fine.
If you have the choice, PDFs should be avoided. They don’t adapt well to different screen sizes and if you don’t keep the source document they can be hard to edit and to make accessible.
Step 3. Provide text alternatives for video
If you’re using video I have some good news. Box of Broadcasts, Kanopy, YouTube, and our upcoming lecture capture system, Panopto, provide either subtitles or closed captions for most video they host. With the latter two, these are auto-generated and can require a little tweaking to get them correct. You will not be expected to manually correct subtitles unless explicitly requested by students on a per video basis.
Step 4. Use an online reading list
Next we come to reading lists and there is more good news. Provided you follow the processes recommended by the Library, you shouldn’t need to do anything extra.
All reading for your module should be passed via the Library reading list. The Library will then ensure the readings are accessible.
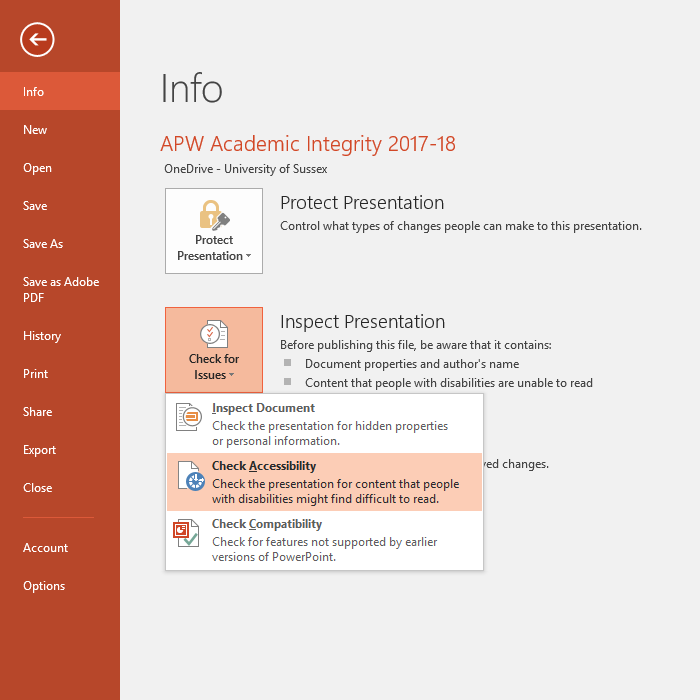
Step 5. Run an accessibility check
There are built-in accessibility checkers in Canvas, Word, PowerPoint and Adobe Acrobat (for PDFs). The better the accessibility of the original document, the better these will work, so like a spell check, this is best done last.
A couple of points to bear in mind:
- Not all images require alternative (alt) text. If an image is purely decorative the alt text can be left blank. Canvas allows you to tick a box to declare the image is decorative.
- There is a degree of personal judgement required. Accessibility checkers won’t tell you something is definitely inaccessible. They will just suggest things that look problematic.
Accessible design benefits everyone
Hopefully I’ve persuaded you that this is not as onerous as it may originally have sounded. If you still find yourself asking why you need to do this now when you don’t know of any students with disabilities or specific learning needs on your module, I have a few last points to mention:
Not all students who have accessibility needs will present themselves to you and while you may not have someone this year you may well the next.
You gain too. Accessible design is just good design which benefits everyone. Have you ever been sitting in a noisy room or on a quiet train without headphones and wanted to watch a short video but it didn’t have subtitles? Have you spent time searching through a Word document trying to make all the headings look the same, or spent precious minutes picking-out headings to put together a table of contents? Have you spent ages zooming in and out of a PDF document on your phone trying to read the tiny text? Have you spent three clicks too many looking for the “click here” which takes you to the page you want to see? Have you used an app to read-out a web page to you to give tired eyes a break? I could go on.
If you have any further questions or concerns please contact tel@sussex.ac.uk and we’ll do our best to help.
