Accessibility is a hot topic in Higher Education. Around 15% of the student population at the University of Sussex have registered disabilities with potentially many more who have unidentified or undisclosed needs.
Mobile devices and the iPhone in particular have been a massive enabler for people with disabilities. Google have also made accessibility improvements over recent years and the latest versions of Android rivals iOS for features. Blind students may use the inbuilt screen readers (VoiceOver, iOS or TalkBack, Android) and students with physical disabilities may use alternative means for navigating their devices such as switch control.
In this post, we will focus on some of the other features that can help to improve the experience of accessing learning resources on mobile.
Display options and reading the screen
Mobile phones are by their nature small so the default text and graphics also tend to be quite small, however it’s easy to change the font size. These support pages will show you how to cChange font size on Android or iOS devices.
Colour blindness affects around 4.5% of the population, which equates to around 1000 students at Sussex. Both Android and iOS enable users to apply colour filters to their screen to improve contrast and readability. These support pages will show you how to change colour filters on Android or iOS devices.
If you need help reading on your mobile device you don’t have to use a full featured screen reader such as those mentioned above. Once iOS’s Speak Screen function is turned on, swiping down with two fingers will read whatever content is currently displayed on screen. Android has a similar Select to Speak option which will read all text that is visible on screen.
Taking control
Wellbeing is an increasingly important topic in HE and mental health condition is the most frequently registered disability at the University of Sussex. Your digital devices can help you to improve things. Android version 10 includes a focus mode which allows you to pause notifications from distracting apps. On iOS, ScreenTime will allow you to pause notifications while also allowing you to set usage limits for certain apps.
You may not want all these accessibility features turned on all the time so both iOS and Android offer shortcuts to open them. Newer versions of Android have a dedicated accessibility button at the bottom of the screen which can be configured to launch certain tools. On iOS, the home button or side button can be set as a shortcut to launch accessibility tools.
What’s coming?
This is a fast changing area. The most recent Google devices now provide real time transcription and captioning for any media playing on the device, without the need for an internet connection. Apple also continue to make improvements. To keep informed, Google provide accessibility help pages with up-to-date guidance on the Android accessibility. Information on iPhone accessibility features are available on the Apple website.
If you have other questions about how you can make your teaching practice more accessible, please contact tel@sussex.ac.uk.
In the latest of our ‘Accessibility Tips’ blog posts I will be looking at some quick and easy ways that you can check that the digital materials you produce meet the legislation requirements and provide an improved learning environment for all. You can read more about digital accessibility in the Digital Accessibility toolkit.
Use the Accessibility Checklist
Many tools have built-in accessibility checkers, but these will work best if you have already used accessible design features in your documents. This Accessibility Checklist (which you could even print out and pin up near your desk) will help you create materials that are accessible. Our blog post on inclusive design also has some great tips on this.
Think of any accessibility checkers in the tools you use as like spell-checkers; you still try to spell everything correctly as you write, but they are great to use at the end of the process. Like spell-checkers, accessibility checking tools will not necessarily identify every issue.
Check content in Canvas
When you are creating content in Canvas you can use the integrated accessibility checker which is available wherever the Rich Content Editor (RCE) is used. That includes Announcements, Assignments and Discussions as well as Pages. The tool checks tables, headings, alt-text for images and text contrast and offers suggestions to fix issues.
To learn more about the Canvas Accessibility Checker see:
If you are using Word documents or PowerPoint presentations there is a Microsoft Accessibility Checker that makes it possible for you to check the accessibility of your documents directly from within the programme by selecting File > Check for issues > Check accessibility. This is useful for pre-existing documents, but if you are creating new documents, following guidance to make them accessible as you create them will help you to minimise the work involved in checking and fixing issues.
To learn more about making Word documents and PowerPoint presentations accessible see:
PDF (Portable Document Format) has been used extensively for displaying documents online because they can be viewed and look the same across a range of devices. However, now that more material is being viewed on mobile devices and we are thinking more about accessibility, PDFs are posing challenges.
Staff at the University of Sussex have access to Adobe Acrobat Pro DC which allows you to check the accessibility of existing PDFs:
Select Tools > Accessibility to open the Accessibility Checker.
Run Full Check
Select Start Checking
When creating new documents, however, it would be worth considering whether PDF is the best format to use and if you decide to use PDF take care to make it as accessible as possible.
The TEL team are always happy to advise and support staff in making teaching materials more accessible, so please contact us at tel@sussex.ac.uk if you want to discuss what is best for you and your students.
It might feel daunting to create an accessible document from scratch. Luckily with just a few good design principles you can create wonderfully accessible documents in just a few simple steps.
Making documents accessible isn’t about making everything the same and restricting creativity, it’s about creating a document that is inclusive. Designing a document poorly may mean that some students will not get the benefit of it, or may miss out on crucial information that other learners will be getting and therefore be disadvantaged.
To help you with this, we have created our Digital Accessibility Toolkit, a collection of links and guides to best practice when it comes to making your resources digitally accessible. Below we’ve highlighted our top three tips for getting started. Be sure to check out the full toolkit on our webpages.
3 top tips for creating accessible resources
Tip 1: Use Heading styles
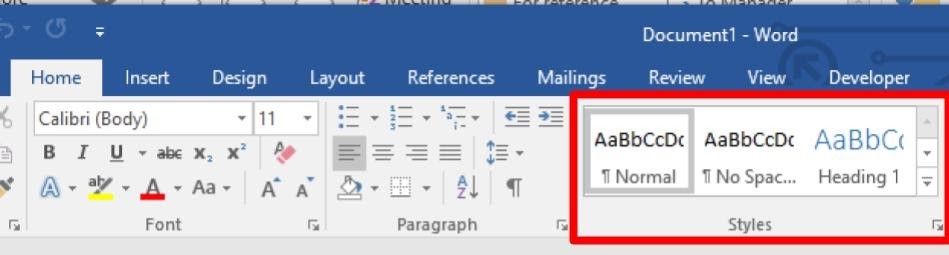
Make your work more accessible and reduce your workload? Impossible I hear you say, not with heading styles. Unless you need to have specific fonts or colours, then selecting heading styles does some of the work for you, they style your text accordingly. Not only that they also markup the text so that someone who screen reader or navigates with a keyboard instead of a mouse can easily navigate the document.
Screenshot of ribbon in Microsoft Word with Styles highlighted.
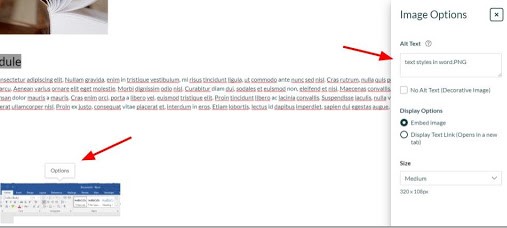
Tip 2: Add Alternative text.
Videos and images are more popular on websites and modules sites than ever. It’s easy to create rich media content, but it’s just as easy to forget that there are some users who simply can’t hear or see the great content you are sharing with them. Our second top tip is Alt text, this can be a description of an image or closed captions on a video. There are a range of tools to support you with this, you can find guidance in the toolkit.
Alt text in Canvas.
Tip 3: Provide materials in advance.
Whilst not strictly a design point, it helps. A great one for all your students, it gives them the opportunity to prepare questions or to do some advance reading. It is particularly useful for students whose first language isn’t English and students who may require more time for processing. It also gives opportunities for students to convert the materials into a format of their choosing, for example by using SensusAccess to convert a text document into an mp3 and listen to the reading on the bus on their way to the lecture.
There is of course much more you can and should do when creating and providing documents, pages and resources for teaching and learning, but follow these top tips and you’ll be making a great start.
If you need further guidance, support or want some sessions for you and your colleagues, please get in touch with us tel@sussex.ac.uk. We’re more than happy to help.
Few would want to exclude a student from getting the most out of their educational experiences. As a University we strive to limit disadvantages that may be experienced by students and ensure everyone has an equal opportunity to achieve the outcomes of their course.
There are many reasons why we should make our teaching as inclusive as possible. Inclusion is one of our University’s aims under the Learn To Transform pillar of the Sussex 2025 Strategic Framework and is part of our widening participation and decolonising the curriculum agenda. It is also a requirement of the Equality Act (2010) to prevent discrimination in relation to an individual’s protected characteristics and to meet the new legislation governing accessibility of websites and mobile applications for publicly funded institutions, including universities,. But what do we need to consider to ensure the learning that happens on our courses is inclusive?
Inclusive learning necessitates teaching in a way that:
respects the diversity of our students
enables all students to take part in learning activities, regardless of their backgrounds and abilities
removes any barriers that prevent students from learning.
There are four areas in which we can look to ensure we are being inclusive as teachers, and these are our curriculum design, our approach to teaching, the production of learning materials and ways in which we assess our students.
Inclusive curriculum design
In order to ensure that a curriculum is inclusive we recommend that clear guidance is given regarding teaching methods used and engagement with them. These should be explicitly referred to in the handbooks and pre-registration materials.
One well known approach to the creation of an inclusive curriculum is Universal Design for Learning (UDL). A UDL approach involves curriculum being designed from the outset to be accessible and inclusive based on the understanding that the production of accessible content and activities will be of benefit to all students. This can often be achieved most effectively by optimising student choice in how resources can be accessed, how learners can engage with learning activities, and in assessments. This empowers students to personalise their learning. Sometimes it might be appropriate to develop learning resources, activities and even assessments in partnership with students.
Course and module learning outcomes and assessment criteria should be written/reviewed with consideration for accessibility and inclusivity. Outcomes and criteria should be accessible and understandable. Students should be included in reviewing outcomes and criteria for accessibility wherever practicable.
Students should be able to participate in learning sessions in multiple ways, reducing potential barriers to engagement. This might include technology-based participation tools. By including these different methods by which students can participate we can promote intercultural communication and help to overcome language barriers.
Inclusive learning resources
Providing text documents and slides online is common practice. However, care should be taken to ensure that the documents are fully accessible and can be read and navigated as easily by a digital screen reader as someone reading directly from the screen. Technology Enhanced Learning has developed a digital accessibility toolkit to help teachers produce accessible documents and check the accessibility of existing documents. It provides guidance on many document types including use of the in-built Canvas accessibility checker. Ideally documents provided to students should be made available in multiple formats (e.g. as both Word and PDF formats) to optimize flexibility for students who may need to adapt the document for accessibility, or for accessing across different devices. We should also point students to SensusAccess, a library tool that allows students to convert learning materials to alternative file formats.
It is strongly recommended that all readings are disseminated by the University Library Online Reading Lists system. The library provides sufficient copies of Essential and Recommended titles submitted on online reading lists, either in print or digital formats, from a range of suppliers. There is an alternative formats service, to enable access to print resources if electronic versions are preferred, and the digitised chapters that are scanned in house are copyright cleared and OCR compatible.
Inclusive assessments
Ideally students will be able to demonstrate their learning in different ways and there should be opportunities for formative assessment and feedback and feed-forward. The principles of UDL foreground the benefits of choice as a means of enhancing inclusivity so where there are a range of means for students to achieve the same learning outcomes student choice should be embedded in module assessments. For example, if essay writing is not part of the learning outcomes then opportunities to submit video, a podcast and alternative formats to express their learning and argumentation skills should be possible. This can be achieved by using the Portfolio assessment mode in Sussex assessment setups.
There should be clear constructive alignment between outcomes (at module and course levels) and assessment methods for testing these. Assessment should be as authentic as possible, thus providing students with experience in tasks encountered in professional contexts.
Help and guidance
In our efforts to make our teaching inclusive we should consider the curriculum design, our teaching methods, the learning resources we make available and our modes of assessment. If you wish any advice on making your module more inclusive please contact the TEL team on tel@sussex.ac.uk who will be more than happy to help or point you in the right direction.
When students arrive at university, and throughout their studies, one activity they may find challenging is reading academic texts. This may be due to a number of reasons: students may not have any prior experience of reading this type of material, they may be unfamiliar with the style and language used, or they may be struggling with the volume of readings that they must complete. To help students in their reading, the Business School sought to create an Active Reading resource that can support staff to embed the teaching of academic reading skills into their modules.
Technology Enhanced Learning has worked in collaboration with the University’s Academic Skills team to develop a reusable Canvas resource which staff can quickly import into their modules and use within their teaching. The resource draws on the model for active reading (watch the video below to learn more about this model) is designed to be flexible so that staff can adapt the resource to fit their teaching. It can be used before, during and/or after a teaching session or as an independent study resource. The Active Reading resource features:
A guidance page for staff which takes them though each aspect of the resource and highlights where it can be adapted to suit their teaching.
A ‘Check your reading skills’ quiz where students can identify areas they need to work on.
Introductory videos that take students through the module for active reading.
A template for students to complete as they read a journal article, with seminar activities and prompts for staff.
An extension activity for students to develop their critical thinking skills.
When developing these academic skills resources we were keen for them to be embedded within teaching rather than standalone resources. By embedding these activities within taught modules students will be learning academic skills in relation to their course content and will be able to see the relevance of these skills and how important they are to their learning.
The Active Reading resource has been shared to Canvas Commons and can be used by any member of staff at the University. To get started simply follow the steps in the following guide – How do I import and view a Commons resource in Canvas? – and search for ‘Academic Skills: Active Reading’. Importing this into your module will create a copy of the resource which you can then use with your students. If you have any questions about importing or using this active reading resource please contact tel@sussex.ac.uk.
Panopto has the capability to generate automatic captions for any of your recordings using a process called Automatic Speech Recognition (ASR). Captioning of recordings can be very useful for students both in terms of accessibility and inclusivity, helping students who may for example have an auditory disorder, dyslexia or those for whom English may be a second language. The University’s lecture capture policy thus strongly supports and encourages staff to add captioning to recordings in order to create a consistent and inclusive student learning experience.
ASR captions also enable students to search through ASR transcripts for certain words, this means for example if a student wishes to know when in a lecture recording the word ‘history’ was mentioned they can search for the word and find every point in the recording where the word was mentioned.This can be very useful when students may wish to review or revise a certain topic within a lecture.
Adding ASR captions
After you have made a recording there is a time delay until the option to add captions appears for that specific recording, how long this takes is dependent on the length of the recording. For recordings under an hour you should expect the ASR captions to be available in 8 hours and for longer recordings this can take 24 hours.
Once this time period has passed you’ll be able to add in ASR captions, to do this first navigate to the recording and edit the recording.
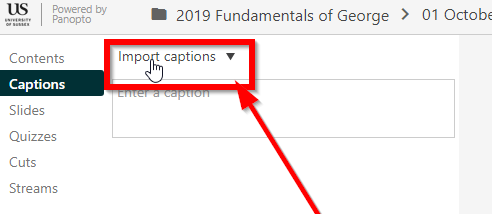
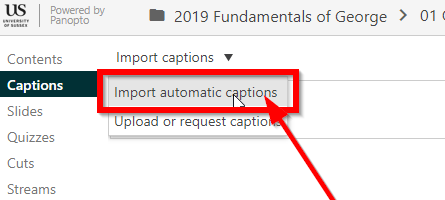
Within the edit window, on the left hand side of the screen, locate and click the option marked Captions. Once you’ve clicked the Captions option a new button marked Import captions will appear. Locate and click this button.
You’ll then be presented with a dropdown box with two options: Import automatic captions and Upload or request captions. Click the Import automatic captions option.
The ASR captions will then be generated and below the Import captions button a transcript of the generated subtitles will appear with a timestamp indicating when they will appear during the recording.
The ASR subtitles are not 100% accurate, this is due to the fact their primary function is to support the word search function and you may find there are some inaccuracies within the transcript. If you wish to manually correct these inaccuracies you can do so by left clicking on the text you wish to correct, this will then allow you to edit the text, deleting and adding text as you wish.
How ASR captions appear
When viewing a recording viewers can toggle captioning on and off through the closed caption button next to the video timeline along the bottom of the screen.
Clicking the ellipsis button at the bottom of the screen will also give viewers access to the Caption Settings menu, from here the position, color and size of the captions can be adjusted to suit the needs of the viewer.
If you have any questions around using ASR captions or Panopto please do contact tel@sussex.ac.uk.
With Panopto you have the ability to livestream any recording you make through the Panopto recorder app on Mac or Windows. This lets you In doing so you can share your recording with any audience you wish by sharing the private link. Panopto refers to this as a webcast.
Scenarios where Livestreaming could help
There are many teaching and learning situations where livestreaming would be useful. Here are just a few examples:
Accessibility. If a student is at home or unable to be on campus for any reason. You just tick the button, share the link and they can watch and take notes as if they were there.
Research seminars. You may wish to open the audience of these by allowing remote viewers to take part and submit questions.
Teaching across campus or institutions. If you have a module that is being taught across institutions and the same lecture you give here is relevant there. You can set up a live stream and give a simultaneous lecture.
Lab demonstrations. where there might not be enough space to safely demo, students can observe from a distance.
How to set up a Panopto webcast
There are two ways to set up a webcast; you can do this in advance, or at the time of recording. Both these routes give you a viewer link. Share this link via email or perhaps as an Announcement in a Canvas module.
Creating the session in advance, gives you the benefit of being able to share the link before you start recording and to add things like a description and Preview image. Setting a webcast up at the time of recording is a one click process, you just then need to share the link.
See below for a step by step guide on how to set up a webcast via each route. For more detailed guidance please see the links to Panopto support at the bottom of this post.
Setting up a webcast in advance
Go to Panopto Recordings from a Canvas module and click the Open in Panopto icon
Give your webcast a title, choose the recording Folder and add a description (optional).
Click Create
When your webcast is created you will see the usual Overview window, where you can add a Preview image if you wish.
Below this you will see the Viewer link, this is the link to share with your viewers.
When you are ready to stream, go back to the recording, click Settings and under Actions, click Record.
This will open Panopto from where you can manage the captured sources and click the red Record button when you are good to go.
Setting up a webcast at the time of recording
Start the Panopto recorder by going to a Canvas module. Click on Panopto recordings > Create > New recording or launch Panopto directly on your computer.
Set your sources, name your session and check the folder you are recording to.
Tick the Webcast box
Once you start recording a Viewer link will be created at the bottom of the recorder window below the discussion posts.
Where can I get more help and support?
As ever, if you want to chat further about livestreaming with Panopto for teaching and learning, or need support in setting it up, get in touch with us by email tel@sussex.ac.uk. Or contact your learning technologist directly.
Below are links to the support pages on Panopto, with more detailed guidance.
Panopto’s headline function is lecture capture but you don’t have to be in a classroom to record a Panopto video. The ability to record at your desk or elsewhere using your own laptop opens up a range of other use cases. Here are a few ideas for how you can use Panopto for more than recording a lecture.
Short introductions or summaries.You can make a short screencast presentation to share with your students. This might be an introduction to a module or some concepts you’ll explore further in class (as with flipped learning), or a condensed version of your lecture designed as a more effective recap.
Manual (eg lab) processes. In many subject areas there are simple practical processes that students need to learn. You can create a short video to explain this and students can revisit it as and when they need. This approach particularly lends itself towards short processes that change little over time. Here is an example of a setup for recording in a lab.
Student screencasts. Rather than you doing the recording, let your students capture and share their presentations. This can be a great way to summarise project work and give students practice at real work life skills.
Marking and feedback. Written feedback for assignments can often be difficult for students to understand. Screen capturing the marking process and providing this to the students as a Panopto video can be a good alternative or addition. This might involve working through common issues on a sample paper or marking actual student papers and restricting the access to the video to just the relevant person.
Field trip recordings. Field trips may be inaccessible to a number of your cohort. Capturing the trip and sharing via Panopto can help to plug the gap for those who were unable to attend as well as providing a good record. Here is an example of using Panopto in the field.
How to get started
To record a Panopto video you need the Panopto recorder app. You can install this on your work PC from the software centre.
You can also install the Panopto recorder on your home computer or laptop:
From your Canvas module select the link to Panopto recordings.
Select Create
Select Record a new session
You should now see an option to download the Panopto recorder.
Panopto will also allow you to upload video created from other sources. So you are not just limited to what you can capture from your desktop or laptop.
Remember to add captions. From September 2020 all pre-recorded videos will need to provide captions so do make sure you add them to your videos. Guidance on how to add and edit captions is available on the Panopto website.
More information on recording a Panopto video is available on the TEL website or contact your learning technologist via tel@sussex.ac.uk.
We are the Educational Enhancement team at the University of Sussex. We publish posts each fortnight about the use of technology to support teaching and learning. Read more about us.