Thursday 20th May 2021 sees the 10th Annual Global Accessibility Awareness Day (GAAD). GAAD is an international event aimed at focusing attention on digital accessibility and inclusion.
Digital accessibility presents a huge challenge for students with disabilities. A recent report from WebAIM showed that 97% of the top one million homepages on the web do not meet the recommended industry standard for accessibility, WCAG 2.1 AA.
Since September 2018 it has been a legal requirement that public sector bodies including Universities meet the WCAG standard for web content. In June this year that requirement is extended to cover mobile applications as well.
Here at University of Sussex around 20% of our student body have registered disabilities, from physical disabilities to specific learning differences such as dyslexia, and mental health conditions. Addressing this need is core to providing an excellent student experience for all.
Over recent years Technology Enhanced Learning (TEL) and many other areas of the University of Sussex have been working hard to support staff in making their content accessible.
The Library introduced SensusAccess allowing students and staff to easily convert their documents into more accessible formats. Further information can be found on the Library Support Services page.
The Sussex Regional Access Centre, based at University of Sussex have provided a listing of assistive technologies available for students to support them in their studies.
This reflects only a small part of the work going on to ensure we provide an inclusive digital space for students.
Many organisations are putting on open events in support of GAAD and you can find a list of many of these on the GAAD website. Sussex TEL are getting involved and we have teamed-up with our counterparts at Brighton University to offer our own event. On GAAD itself (20th May) we are excited to present a keynote talk from Dr Kevin Merry of De Montfort University (DMU). Dr Merry is an expert in Universal Design for Learning, an approach that he helped to introduce at DMU five years ago.
Dr Kevin Merry of De Montfort University (DMU).
Dr Merry will be presenting his online keynote, ‘Institution-wide approaches to embedding accessibility’, on Thursday at 3pm. The event is open to all staff and students at University of Sussex and the University of Brighton. Please sign-up via eventbrite.
We encourage you to follow and to tweet about GAAD with the #GAAD. If you have questions about how to make your modules accessible, please do get in touch via tel@sussex.ac.uk.
Over the last year many activities that would previously have been run in rooms on campus have moved online. One such activity is the poster presentation. In this post I’ll explore how tutors can adapt this activity for online, gaining some of the benefits of the web environment.
The aim of a poster presentation is to provide an opportunity for students to synthesise and communicate their understanding of a topic. Typically an offline poster session would also provide opportunities for questions and discussion about the topics presented, encouraging students to think more deeply. Poster presentations are also used widely in conferences and research. There are some downsides to offline poster presentations however, particularly in terms of inclusivity. Printed posters are a visual medium and without someone present to explain what is there, may be quite inaccessible to students with visual impairments. They are also tied to a physical space which again may exclude students unable to access that space.
To consider how poster presentations can be done online I’ll break the process down into three parts.
Creating the poster
A simple first choice is for students to create a poster using PowerPoint. It is familiar to many and used widely outside of HE, so a good transferable skill. University of Sussex have a licence allowing all students to use Office 365, including PowerPoint. Microsoft have worked a lot on making their software more accessible over recent years and with the immersive reader built-in the posters can be quite accessible. To maximise accessibility I would recommend students keep their posters in PowerPoint format rather than saving to PDF.
If PowerPoint doesn’t fit your requirements, you could consider alternatives such as MS Sway or Adobe Spark, both of which allow you to create simple, attractive web pages which can be shared. Students should be able to access either of these services using their University of Sussex Login.
There are many more options for creating a poster or webpage. You could even set basic criteria for what the presentation should include and leave students open to choose. Please note you may need to set some limitations if this is an assessed activity and make sure you specify that students provide their posters in a format you can access. Do contact TEL if you have questions.
One final point on accessibility. The visual design of the poster may still be an issue for some students. You could consider making this a group activity, allowing sighted students to support those with visual impairments.
Putting it on display
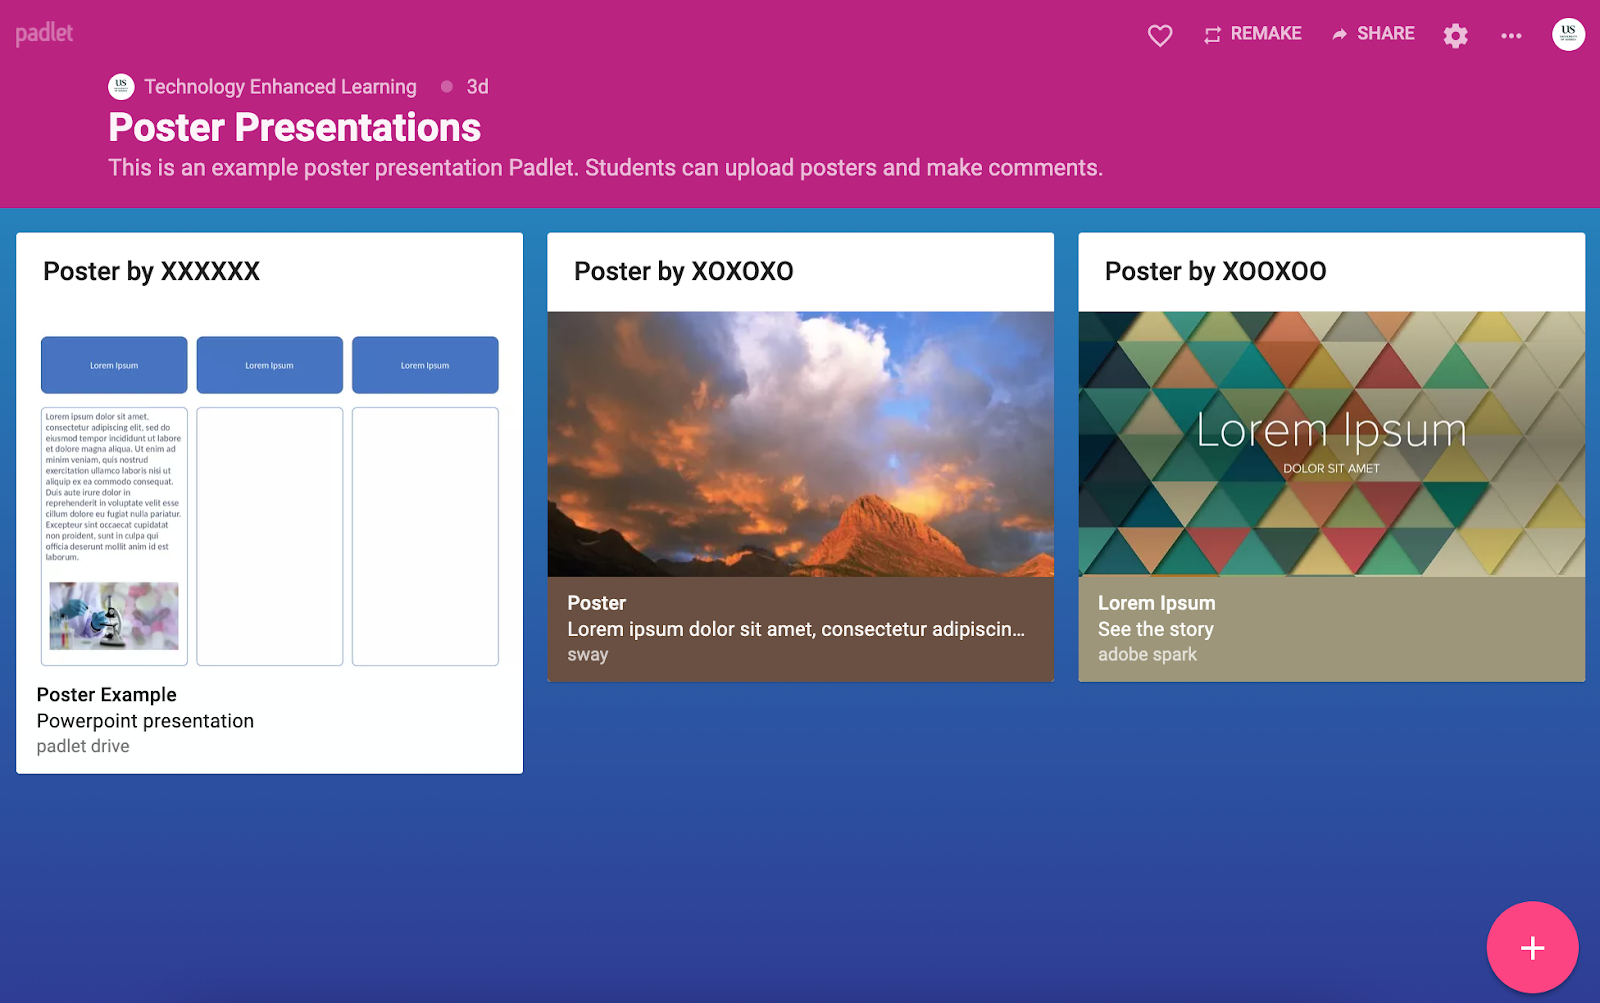
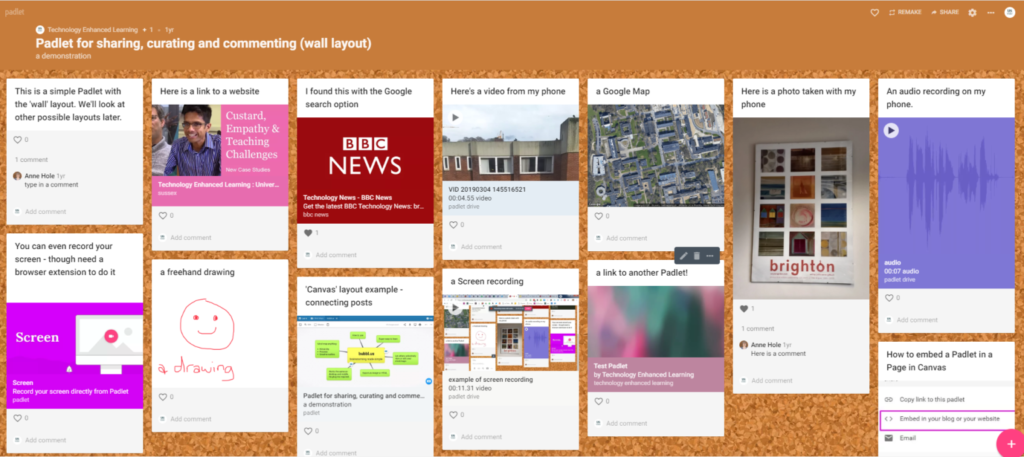
A great option for displaying the posters is Padlet. Padlet will allow each student to submit a file of up to 250mb in size or add a link to a web page. If students upload PowerPoint files, these can be previewed in a web browser but could also be downloaded if required. The Padlet posts are displayed tiled on a web page, making it easy to scroll through and view each poster.
An example poster presentation page using Padlet.
If this is a contributory exercise, you might consider using a graded discussion in Canvas. While this might not be as visually appealing as Padlet it is simple to create and to grade. Students can upload their PowerPoints or add links to their Poster pages in the discussion. As with Padlet, PowerPoints can be previewed in a web browser. Once students have made their posts you can view and mark a summary of each student’s contributions via the Canvas Speedgrader tool.
To provide a more human element and make the activity more inclusive, in addition to the poster itself you might ask students to record a short verbal explanation. This might be added as a short narration to the PowerPoint slide or both Padlet and Canvas discussions offer the ability to record a short video.
Allowing for discussion
The final part of the process is to allow for students to discuss and question each other about their posters.
Padlet will allow students to post comments and add reactions such as ‘heart’ or thumbs up/thumbs down to the Posters. Canvas discussion forums as their name suggests will also allow students to post questions and comments in reply to their peers’ displays.
Asynchronous discussion such as that suggested above, run over a day or week is a flexible and relatively accessible way to manage this element of the activity but may not provide the immediacy of an in-class poster session. If you prefer a live experience, Zoom offers the ability for attendees to choose a breakout room to visit. You could set up a Zoom meeting with a separate room for each poster. Zoom supports up to 50 rooms though I would not recommend having this many! Students could then move to a room of their choice and discuss with the presenter.
There are many options for delivering an activity like this and if you have your own suggestion you’d like to share, we’d love to hear about it. If you would like to run an online poster presentation, or have other questions about delivering teaching online, get in touch with us via tel@sussex.ac.uk.
Have you ever wanted to pose multiple choice questions to your students during a Zoom meeting? You can do this with Zoom’s inbuilt polling option which allows you to create single or multiple choice polling questions and then pose them to everyone in a Zoom meeting. You can then view and even download a report of the students’ responses.
What’s a Zoom poll?
Each poll consists of up to 10 single choice or multiple choice questions and each question can have up to 10 potential answers. You can create up to 25 polls per Zoom meeting. Zoom polls do not have all the features of a dedicated polling platform like Poll Everywhere, but they allow you to ask questions within Zoom easily.
Why would I want to use a Zoom poll?
There are a number of reasons that a Zoom poll can be a useful addition to your teaching sessions:
Engagement. It can be hard to concentrate on and engage with someone speaking for long periods of time. A good way to break up periods of talking can be to include a short activity allowing learners to engage and think about what they are learning. A quick poll can be a great way to wake everyone up and allow them to interact and be active rather than passive learners.
Identify knowledge gaps and comprehension. You can use Zoom polls as an informal formative assessment within a session by polling students with a few multiple choice questions based on the topic they’ve learnt. Their answers can help you to identify their comprehension of the topic and any knowledge gaps they may have, you can then use this information to tailor the rest of your session by focusing on where students are weakest.
Surveying. Polls can work well for surveying your class quickly, for example letting the class decide as a group which topic to focus on next in a session from a list of options, or getting their opinion on a topic i.e. ‘Do you agree with statement A? Yes or No’ .You can even use a poll for feedback on how they feel the session is going or to ask if they’d like a break.
How do I create a Zoom poll?
Some key things first, we recommend that you set up the Zoom polls ahead of the session itself rather than during the meeting.
So with that in mind first go to the Zoom web interface at https://universityofsussex.zoom.us/ and log on. After you’ve logged on, ensure you select Meetings in the side menu to be shown a list of all the Zoom meetings you’ve created, then find the relevant Zoom meeting where you wish to add a Poll and click on the meeting name.
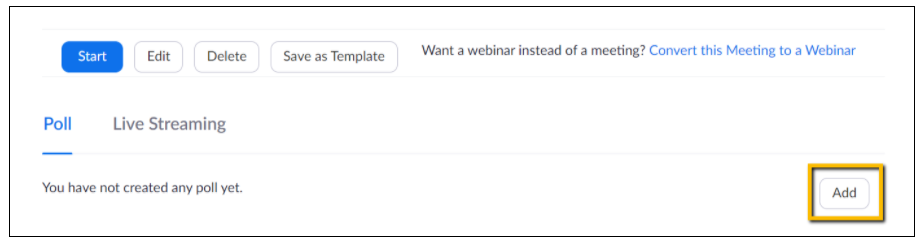
You’ll now be on the meeting information screen. Scroll down to the bottom to find a section named Poll and below that you’ll find an Add button, select this to add a poll.
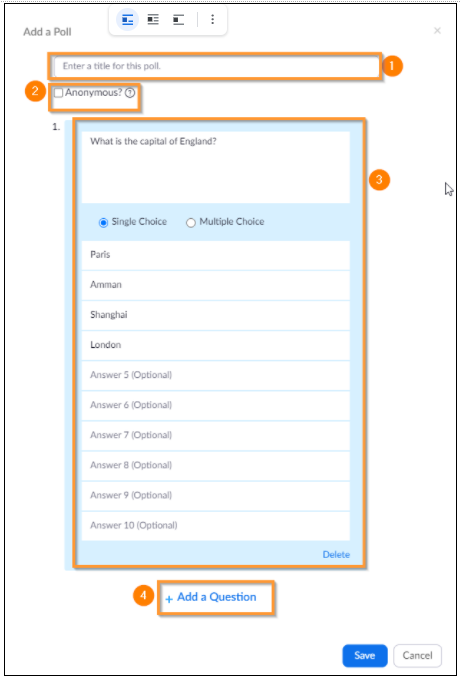
You’ll then be presented with the poll creation screen, from where you’ve got a few different aspects to consider.
This is where you can put a title for your poll to identify it.
Choose if you’d like the results to be anonymous or identifiable.
This is where you can write your questions and answers. You can choose to make them single or multiple choice and you can have up to 10 potential answers per question, though ideally you would not want more than 5.
Click the Add a question option to add another question to the poll. You can have up to 10 questions per poll.
Once you’ve added your questions click Save to save the poll. You can add multiple polls to the same meeting by repeating this process
How do I run a Zoom poll?
Once you’ve created your poll, you can run it during a meeting by clicking the Polls option from the Zoom toolbar.
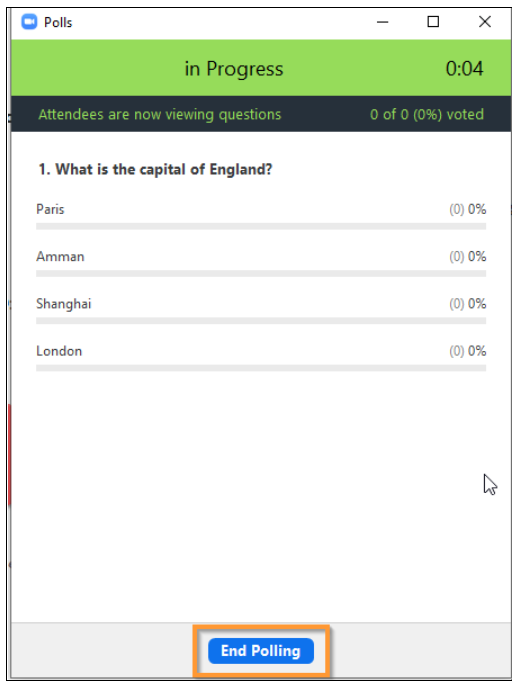
You can then run your poll by selecting the Launch Polling option.
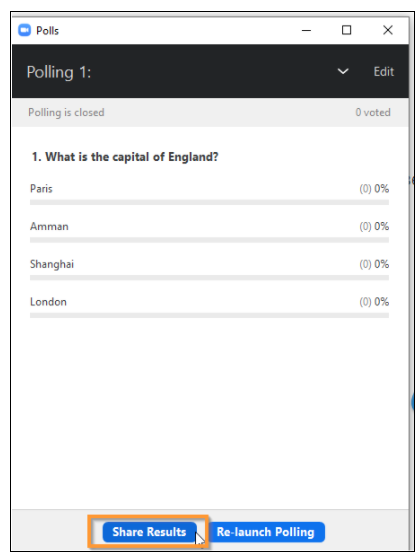
You’ll then be able to see students’ real time responses to the questions as well as a tally of how many have voted. It’s worth noting that students themselves won’t be able to see others responses at this stage. Whenever you’d like to conclude the poll select the End Polling button.
You’ll then be shown the final responses and can choose to either keep this private or share it with everyone else in the meeting by selecting Share Results.
Those are the basics of running a Zoom poll, for more in-depth guidance please see Zoom’s guidance on Polls.
Hopefully this has been a useful introduction to a new tool for you to try out in your next Zoom session. Why not give Polls a try? If you’d like any help setting up your Poll or have any questions then please get in contact with TEL at TEL@sussex.ac.uk
Wakelet has been mentioned a few times in previous posts, notably in Content Curation for Learning and Conference tweeting – some tips and tricks but that was a couple of years ago and it seemed as if it was time for a focused look at this app and some ideas for how it might be useful in a teaching and learning context.
What is Wakelet?
Wakelet is a platform for saving, organizing and presenting content, which could be anything on the web, some text, an image or a file (a PDF or a link from OneDrive or Google Drive).
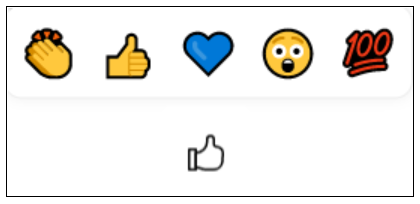
Wakelet is more about curating digital content than conversation and makes it easy to add content from Twitter and YouTube or record your own video via Flipgrid. You can embed a Wakelet collection in a Canvas page so you can bring a curation activity into the heart of your module. It allows you to add reactions to items posted, but does not have an option to add comments to items.
Reactions available in Wakelet
How could Wakelet be used in teaching and learning?
This app could be used anywhere that collecting resources with the option to display and share would be useful. People can collaborate on collections without needing an account, so it could be good for working together on gathering information or sharing ideas. Here are a few ideas for things that teachers and students could do together in Wakelet:
Collect a range of online content on a particular topic and then use reactions to indicate the most useful items.
Create a module newsletter with items related to your discipline that appear in the news.
Build a collection of definitions for key disciplinary terms using reactions to rate them.
You can see more ideas for using Wakelet in education on the learn.wakelet website and the Technology Enhanced Learning team would be happy to discuss any ideas you have..
What should I think about when using Wakelet?
Accessibility
Whatever tools you are using it is important to consider how accessible they are. Wakelet are trying to make their platform inclusive and accessible to all and one key way they are doing that is by building in the Microsoft Immersive Reader which will read out content. You can learn more about this on Wakelet and Accessibility
Cost and signing up
Wakelet is currently free to use and if you invite contributors with a link they don’t need to create an account. If students want to sign up for Wakelet so they can create their own collections then they should check the privacy policy.
Support
Wakelet is a free tool that is not licensed by the University and therefore not supported by ITS, but Wakelet have an online help centre and if you want to discuss ideas for using Wakelet or to talk to someone who has used it you can contact tel@sussex.ac.uk
Devices and apps
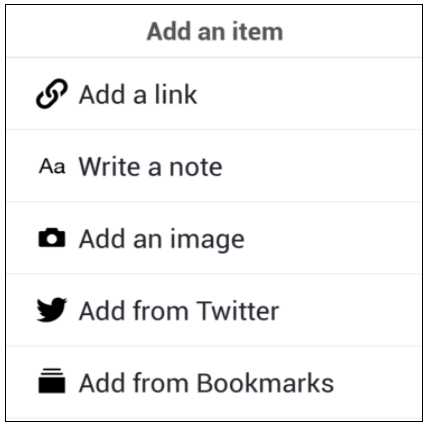
Wakelet can be accessed via a web browser at https://wakelet.com/ and there are browser extensions for Chrome and Firefox for quickly adding to Wakelet. There are also mobile apps for iOS, Android and iPad though there are fewer options for adding content via the apps.
Adding items in a mobile app.
Alternatives
You may already be using Padlet for these types of activities and there are similarities between the two platforms so you might want to consider which will suit your purposes best. Padlet has more layout types (including maps and timelines) and encourages commenting, but you may prefer the appearance of Wakelet or want to emphasize curation over conversation. Other possible alternatives would be:
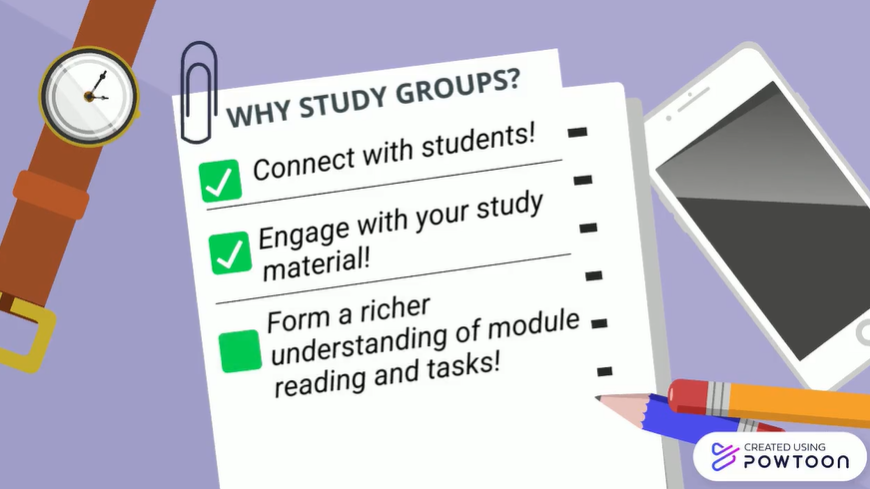
A study group gives students the opportunity to meet on a regular basis and work together towards a common goal, such as unpacking concepts within a module, undertaking weekly module tasks, or preparing for an assessment. This blog shows you how to set up study groups within your module, and provides resources for making these groups inclusive, focussed and effective.
Working in study groups helps reinforce that learning is a collaborative endeavour, rather than a competitive sport. Student collaboration aids learning and when done well motivates students to engage more deeply into their studies. When we communicate with others, we consolidate our own learning. Additionally, working in a group develops a variety of transferable skills, such as cross-cultural learning, leadership, diplomacy, people skills, communication, conflict resolution. While many students find it easy to become part of a study group, those on the periphery of the cohort find it difficult. It is therefore a matter of inclusivity for us as educators to provide the opportunity for all our students to join a study group. With this in mind, we encourage teaching staff to set up study groups with their modules where appropriate.
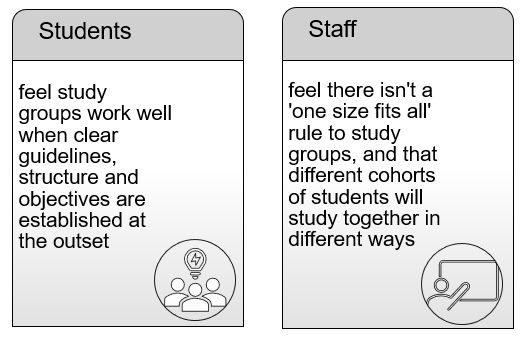
The Technology Enhanced Learning team have been supporting Sussex teaching staff with the setting up of inclusive study groups. We began this work by speaking to both students and staff about their opinions and experiences of study groups, asking what makes a study group work and what prevents a study group from being successful. Two key points came out of these discussions.
Keeping these points in mind, this blog provides 5 easy steps to setting up inclusive, self-running study groups. This guidance has inbuilt flexibility, allowing both students and staff to make amendments depending on the needs of their cohort.
1. Consider inclusivity when creating your study groups
To avoid students choosing their own groups, which may leave some working alone, we suggest assigning students to groups yourself. This can be done automatically or manually via Canvas groups [more information below]. It’s up to you how you allocate your students to groups, but your allocation should lead to diversity within the groups. Diverse study groups are great for many reasons, for example they draw together a variety of perspectives and skills. However, we are aware that diverse groups can be difficult to manage, which is why we have created an inclusivity checklist that can help the smooth running of diverse groups. We encourage you to refer to this when setting up your study groups.
2. Set up study groups via Canvas
You can set up study groups by using the Canvas Groups functionality. There are several ways that Canvas enables the creation of groups by tutors.
Randomly create groups: choose how many groups you want and Canvas will create them and divide the students between the groups.
Manually create groups: create a group and drag and drop students’ names into it.
Self-sign-up: Set the number of groups required, or the number of members per group and let students choose which group they want to join. This would be ideal for group presentations.
Student created groups: Students can create their own groups in Canvas.
In an attempt to ensure groups are diverse and no students are left behind, we suggest selecting either of the first two options. You may wish to offer your students the option to opt out of study groups if they are not a mandatory part of the module. We have created further guidance on setting up study groups, either via Canvas or on an alternative platform, to help you in the initial stages of creating study groups.
3. Give students an agenda template
To keep study groups focussed, you may wish to provide an agenda template for students. Alongside including practical information, such as the date and time of the study group session, it also notes who is undertaking the roles of chair and notetaker, details the topics to be covered within the session, lists outputs to be produced within the session (if any), and provides a space for any preparatory material for the following session. This agenda is most appropriate for students studying on the same module, but please feel free to adapt our agenda template according to your cohort, or give your students the opportunity to adapt the template as they see fit.
4. Help establish healthy group dynamics
To ensure study group sessions run smoothly and groups have a healthy dynamic, we suggest students use part of their first study group session to set expectations for attendance and participation; group behaviour; and roles within the sessions. We have created guidelines on study group expectations, which students can use or amend during their first meeting.
5. Provide weekly goals for the groups
When asking students why study groups sometimes fail, one person responded: ‘because no-one knows what they are supposed to do in the study group,’ and another person stated: ‘because there aren’t clear objectives to keep the group engaged’. Taking this feedback into consideration, we suggest providing weekly goals for your groups. Of course, you won’t want to unnecessarily add to your own, or your students’, workload, but these goals could simply be based on the weekly learning objectives, or the outputs that you’ve already highlighted on your Canvas module site.
For further resources on how to set up successful and inclusive study groups, please visit or enrol on our study groups for inclusivity Canvas site. Additionally, all our resources are downloadable in our handbook for staff running study groups. We have also produced a study group Canvas site for students (visit or enrol). Lastly, if you have any questions or require further support, please don’t hesitate to contact Sarah Watson or Paolo Oprandi.
In January 2020 the Digital Practice Awards were announced with several projects given funding to trial an innovative digital approach to teaching at Sussex. One of the winners was Dr Louise Newnham from the School of Life Sciences. Dr Newnham is a lecturer in Genome Stability teaching mainly at Masters level. Prior to the awards Dr Newnham had made use of MCQs and other questions in Canvas to test student knowledge. Her proposal was to trial use of the interactive activity creation tool H5P with students on two of her modules during the autumn term.
In this post we’ll look at H5P in Canvas and learn about Dr Newnham’s experience of using this with her students.
H5P is a tool for creating interactive displays and activities that can be embedded in pages in Canvas. The tool offers a number of different content types, ranging from accordions, to drag and drop exercises, interactive videos and even 360 image virtual tours.
H5P is available for free on H5P.org with a limited range of content types. The commercial sister site H5P.com allows you to embed a wide range of different H5P activities within Canvas, record student responses and link activity scores to the Canvas Gradebook.
Accessibility is a focus for H5P, and the makers publish a list of the content types which meet the required WCAG 2.1 AA standard. However, there is still a need to ensure that the content you add in any activities you create is also accessible by adding alternative text, using accessible colour combinations and correct document structure.
Dr Newnham created a number of formative activities, embedded within her weekly teaching content which students could access at any point to check their understanding. These were mostly drag and drop type labelling exercises. Students ‘needed to have a global understanding of how something works and that was quite hard to assess using MCQs’, explains Dr Newnham. She also noted these short interactive activities were particularly useful during the lockdown, a time when many students have struggled for motivation.
The results of the trial were positive. All students who responded to the evaluation questions reported that they found the activities useful and would like to see more. The data shows that the activities were widely used with around a third of students completing the exercises and many having multiple attempts. Students also commented in their feedback how the activities would be useful when it came to testing knowledge at a later date.
Dr Newnham is keen to continue using H5P with her students and has begun to explore other content types. She also noted the potential for using this in undergraduate teaching where the technology would scale well across large cohorts.
If you’d like to find out more about different technologies you can use in your teaching, please contact tel@sussex.ac.uk.
This post will look at some digital tools that could be used for activities such as peer learning and applying knowledge. We are also keen to look at apps and tools that could help to build a sense of community. As always, the technology is secondary to the learning aims, but as several of the tools offer possibilities across the range of activities let’s look at each tool in turn and consider how it might be used for learning, what the benefits and challenges are and how accessible it is.
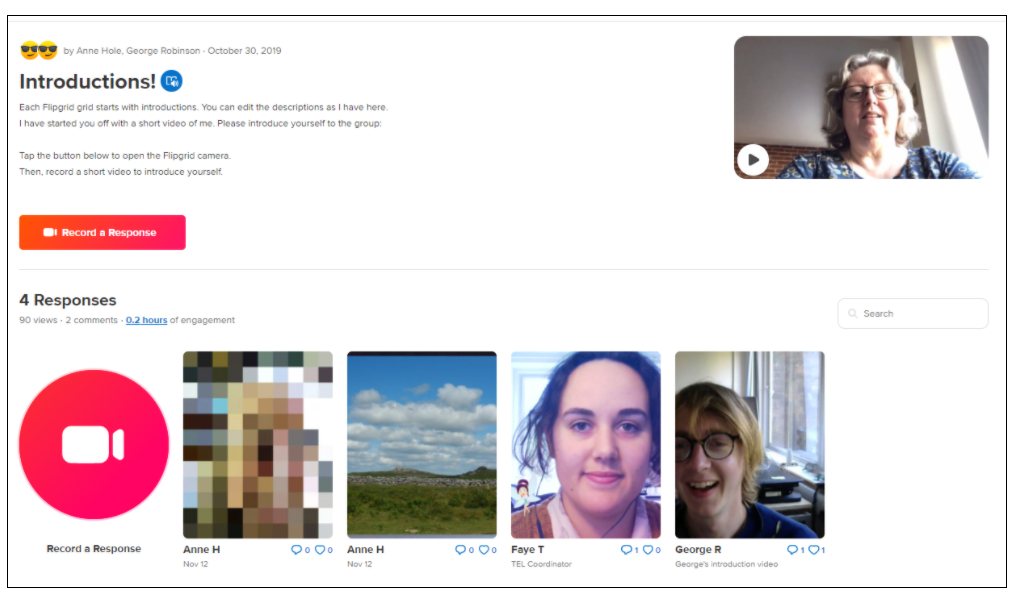
This tool, first explored in our post Flipgrid: video discussions for learning could be used for community building with tutors and students sharing short video introductions. It would also be a good way of students sharing their understanding of a concept or defining a key term in a discipline.
Here is an example of a Flipgrid with an introduction from me and responses from colleagues.
Flipgrid is an informal and user-friendly platform that many students enjoy using. For anyone uncomfortable showing their face (or their environment) in a video there are options for using a photo instead or pixelating the video. As with all video, a reasonably fast internet connection will be required for creating and streaming responses. Flipgrid also works with screen readers, is navigable by keyboard, has captions on videos and includes the Microsoft Immersive Reader.
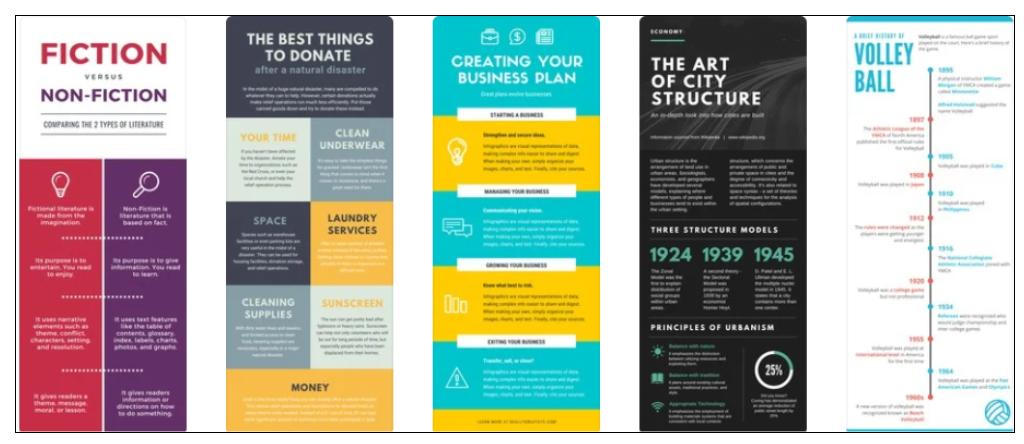
This tool, not to be confused with our online study platform Canvas, helps anyone to design posters, infographics and other types of communications. This could be used by students to create posters instead of verbal presentations, social media posts explaining an idea from the module, or infographics to represent data they have gathered. Here are just a few of the many infographic templates available in Canva.
Canva does the designing for you, so you can concentrate on the content and produce a professional looking output. There is a huge amount of choice, which can make it difficult to select the best template and images for your project, but there should be something free for most purposes. Using Canva does require setting up an account, but this is free. If students are creating posters for submission to a Turnitin assignment they should not use Canva as the exported file types from a free account are not suitable for Turnitin.
Canva may not be as accessible as other platforms, so it would be best to offer it as an option, alongside something like PowerPoint that has a good set of accessibility features.
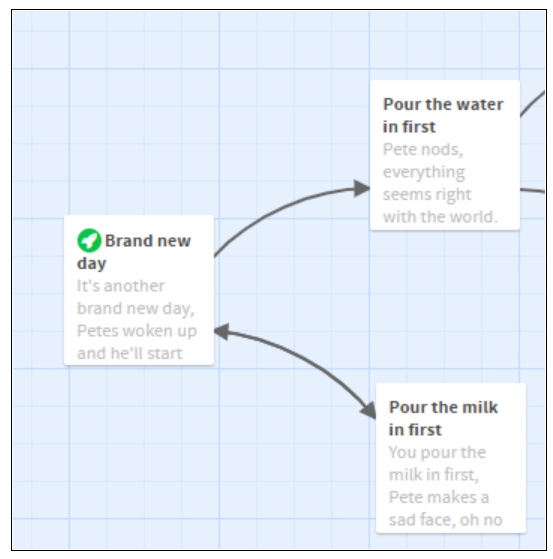
Twine describes itself as ‘an open-source tool for telling interactive, nonlinear stories’ (https://twinery.org/) and it allows users without coding knowledge to create branching scenarios. This could be great for giving students an opportunity to test out their learning in example situations. Or students could create their own Twines for each other. Have a look at this example that uses the simple task of making tea to give you an idea of how it works. This is what the beginning looks like in the creator’s view.
Whether you are the one creating it, or moving through it, a branching story/scenario in Twine can make you think carefully about choices and their consequences. The basic presentation is quite minimalist but there are options to add more if you have some coding experience.
Twine is not particularly accessible by default, but again, if you have some coding knowledge you can make your Twines more accessible.
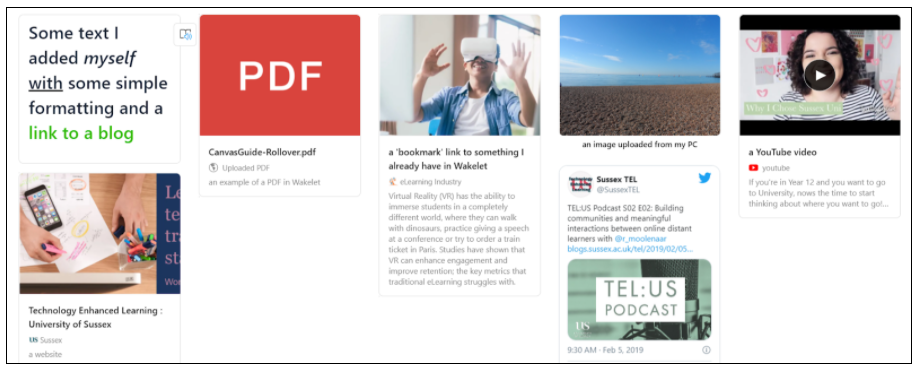
Padlet is an old favourite and many people at Sussex are using it already in their teaching, but it is very versatile and would work well with the tools above – for example, you can add links to Flipgrids and Twines and/or upload Canva posters and infographics so it’s a great place to bring a range of things together in a visual format. Here is an example Padlet showing a range of content.
Padlet are working on accessibility and it is getting better all the time – you can now use screenreaders with Padlet and some functions are possible with a keyboard only. As with all tools/platforms, when using Padlet you should consider whether you need to provide alternatives or modify the activity to allow everyone to take part.
Support with tools for active learning at Sussex
You can read more about a range of apps in our A-Z of apps or contact tel@sussex.ac.uk to discuss ideas and options with a member of the TEL team.
Since its introduction early last year, Zoom video conferencing has been vital for teaching at the University of Sussex. As much teaching will continue to be online in Semester 2, the TEL team have created nine simple guide videos to help you quickly get to grips with this essential tool.
These videos lay out the the process for using Zoom from setting up your meeting, to recording and managing attendees.
If you have any further questions about using Zoom in your teaching at Sussex please see the Zoom pages of the TEL website or contact tel@sussex.ac.uk.
We are the Educational Enhancement team at the University of Sussex. We publish posts each fortnight about the use of technology to support teaching and learning. Read more about us.