

Collaboration is an essential part of learning so, this blog post will explore four tools you can use at the University of Sussex to facilitate digital collaboration.
Read more ›Collaboration is an essential part of learning so, this blog post will explore four tools you can use at the University of Sussex to facilitate digital collaboration.
Read more ›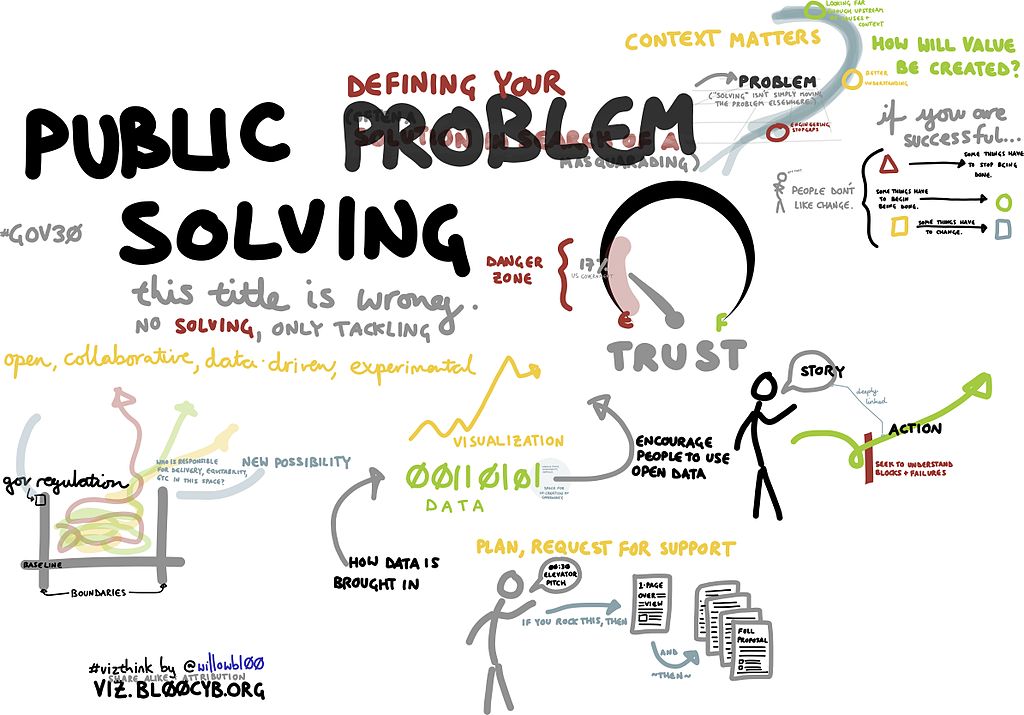
Interested to know more about the practices and theories behind problem-based learning (often shortened to its acronym PBL), the Active Learning Network set up a problem-based learning exploration hour last month which was attended by a number of educationalists across the UK. The idea was simply to pass forty-five minutes together and discuss PBL theory and how it could be applied in our individual contexts and disciplines.
Read more ›
The learning technologies that we use at the University of Sussex see a steady stream of updates as they respond to the needs of their users. We thought it would be useful to pull together all of the recent updates across the key learning technologies in use at Sussex in order to provide you with a summary of newly added features.
Read more ›Thankyou for reading this EE blog post this is representative at the time it is written.

Looking back on the last few years of the TEL blog, the topic of multimedia enhanced teaching and learning was amongst the top posts for viewer engagement, and we thought this topic deserved a refresh.
Read more ›Thankyou for reading this EE blog post this is representative at the time was written.

Polls and quizzes can be great for increasing the interactivity of teaching sessions and encouraging student engagement. You might want to use a poll to kick off a discussion or a quiz to check students’ understanding of previous content before moving on. A quiz after a lecture can also be a great way for students to check their own learning and a poll could help identify topics for revision.
Read more ›
Providing responsive and consistent feedback to students is an important if challenging part of assessment, however there are techniques and tools that can help you as a marker to leave great feedback. One of those techniques, and the focus of this blog post, is using rubrics.
What is a Rubic you may well be asking? The word rubric can have different meanings within a variety of contexts which can lead to some confusion. Within an educational context a rubric is defined as a consistent and coherent set of criteria for students’ work that includes descriptions of levels of performance quality achieved against marking criteria.
Marking criteria are essentially your standards of judgement for the assignment you have set. Your School will have a set of marking criteria for each assessment type. Such generic assessment criteria can be tailored to the individual assessments within your modules.
Marking or scoring rubrics, (also called ‘grading forms’) are a guide to marking against such generic standards of judgement. As such, rubrics set out how generic marking criteria have been tailored for, and should be applied to, a specific assessment task. Often constructed as a table or grid, rubrics map the agreed criteria against quality or grade descriptors.
Good rubrics also include explicit definitions of the quality expected for the different levels of judgement. Rubrics can incorporate precise scores for each criterion and level of achievement, or be used as a guide for assigning qualitative marks.
Rubrics allow teachers to structure their own observations of a student’s work against the description in the rubric. As feedback is supplied individually for each criteria it can then help a student to identify their work’s strengths and weaknesses and work out which areas of their work require improvement.
This also allows for cohesiveness in the feedback a student achieves, if they can compare feedback across different pieces of work that have all used the same rubric for their assessment then it creates a clearer path to improving their learning. Rubrics have also been found to reduce students’ anxiety and so support performance. Students report increased confidence and greater transparency into the marking process as they have a better idea of what is expected of their work and how it can relate to their grades.
So there are some researched benefits into using rubrics, but how can you go about using them in your assessments? Any submission using the standard e-submission workflows of Turnitn or Canvas Online (please note that assessments done have tools which allow you to attach rubrics to your assessments. Rubrics can be used for all sorts of assessments both summative and formative in a variety of contexts.
The way that Turnitin Feedback Studio allows you to create and mark with Rubrics is through the use of a grid-based form containing criteria (on the vertical axis), scales (on the horizontal axis) and descriptors (on the grid) where you can add predefined feedback comments.
Tutors can use this tool to provide feedback on a student’s individual piece of work by selecting the relevant boxes on the grid which indicate the performance level on the scale in relation to each of the criteria.

A single rubric can be created in order to provide consistency for marking all submissions, however each custom Rubric form can be reused, adapted and shared for use in other assessments. When students view their feedback inside Turnitin Feedback Studio they’ll be able to view this rubric and will be presented with the descriptor based on the scale they have reached for each specific criteria.
Canvas Online allows you to create rubrics by defining criteria and ratings taking the form of mark values or mark ranges for each criteria. It’s also possible to define a set amount of points it’s possible to achieve in each criteria and you have the option of using these points to make up the students overall grade for the assessment. Points can however be disabled within the rubric itself. You also have the option to not use defined marks but to write freeform comments as feedback for each criteria.
Students will be able to view the rubric and the rating they have achieved (or freeform comments in the absence of a rating) when viewing their feedback within Canvas.
TEL have created a Rubrics guidance page on our Teaching Online, Learning Anywhere site which hosts a variety of good practise, examples and guidance on using rubrics within your assessments. These Canvas Guides may also be helpful:
If you’d like any help in designing or applying rubrics then please get in touch with TEL at TEL@sussex.ac.uk
When learning together, a digital space to capture and/or organise ideas can be useful. Whether in-person or remote, synchronous or asynchronous, activities using digital whiteboards can help students to build on each other’s learning. This post will look at a few types of activities and some tools that could be used for them.
Before we consider some of the digital tools available it is worth thinking about what your collaborative activity is intended to achieve and the context in which it is happening. Here are some examples of ways that digital whiteboards might be used in a learning environment:
Most of these could occur in either in-person classes or remote sessions and may be synchronous or asynchronous.
Depending on your activity there are a few tools that will suit you. This grid will help you choose which tool(s) to try. We have indicated whether there is an institutional licence, which tools are useful for remote, in-person, synchronous and asynchronous activities and provided a link to information about accessibility.
| University licence | Remote and in-person? | Synchronous and asynchronous? | Accessibility | |
|---|---|---|---|---|
| Zoom whiteboard | Yes as part of Zoom | No, available during Zoom meeting only. | No, available during Zoom meeting only. | Zoom accessibility |
| Padlet | Yes, for staff | Yes | Yes | Accessibility and Padlet |
| Microsoft Whiteboard | Yes as part of Office 365 | Yes | Yes | Microsoft accessibility |
| Miro | No but free options | Yes | Yes | Miro accessibility |
| Mural | No but free options | Yes | Yes | Mural accessibility statement |
Zoom whiteboard is the simple choice if you are in a Zoom meeting. It has some useful functionality and avoids the need for participants to open any other tools. You can read more about using whiteboards in Sharing a whiteboard from the Zoom support pages.
If you want something that can be used in a live session but also before and/or after the class then Padlet or Microsoft Whiteboard would be good choices depending on the activity. We have written several blog posts about Padlet which should give you an idea of the possibilities:
Microsoft Whiteboard is probably less familiar, but as part of the Office 365 suite of apps it is available to all staff and students at Sussex.

Miro and Mural are similar to each other and have more options than any of the whiteboards we have looked at so far. Neither is licensed by the university, but there is a lot that can be done with the free versions and Miro also has an educational licence. Both offer a range of templates so you don’t have to start from a blank board and finished boards can be embedded in Canvas. Members of TEL have tried these and like some of the features such as Miro’s ‘Follow’, ‘Bring to me’ and ‘Bring everyone to me’ as well as the timers, chat and presentation options.
If you think you might like to try one of them, this detailed comparison of the two apps might help you decide which one will suit your purposes.
As always, it is important to consider accessibility when using digital tools. If using one of these in teaching you should check whether there are any accessibility issues and make alternative arrangements when necessary. There is more guidance on accessibility in our Digital Accessibility Toolkit.
If you are planning to use digital tools in an on-campus session it will be important to advise students to bring their mobile devices and to check that the tool you want to use will work well with most devices. If necessary pairs or small groups could collaborate via a single device (Covid restrictions allowing).
University of Sussex teaching staff can contact a learning technologist via tel@sussex.ac.uk to discuss whiteboard options.
Ever since I met Dr Nimi Hoffmann in the corridors or Essex House and talked to her about her use of Wikipedia in her teaching I have been inspired by the idea. Nimi, Dr Cecile Chavalier, Matthew Taylor, Dr Richard Nevell of Wikimedia UK and I have been meeting regularly to make Wikipedia type assessments a reality here at Sussex. Nimi had begun to use Wikipedia in her masters-level teaching at Rhodes University in South Africa, and last semester aimed to strengthen and deepen this teaching at the undergraduate level in the International Education and Development module which she convenes.

Part of my excitement about the project is its scope in creating authentic assessments. These are forms of assessment which require students to apply knowledge and skills learnt in their studies to contexts outside of the education domain. Student assessment tasks, such as essays and examinations, and the skills they require, are unlikely to be needed again outside of education and the students’ demonstration of their learning is contained to a restricted academic audience. At the University of Sussex many academic Schools and Departments are looking at how they can add more authentic assessments to their modules.
Wikipedia assessments can be thought of as authentic assessments. They require students to share fully referenced knowledge to a global audience. They can get students to think very differently about their assessment challenge and although they can be daunting, through the right support they are often inspiring and promote deeper thinking and criticality. Furthermore, contributing to Wikipedia increases their citizenship and agency and these match the aspirations we have for our graduates as outlined in our 2025 strategic framework.
Consequently I organised a time to discuss with Nimi what she did to change her teaching and assessments and why she felt it was important. The following is an extract of my talk with Nimi:
I study knowledge commons, and over this last semester, I have been piloting the use of Wikipedia – which is a kind of commons – in teaching and learning at Sussex.

I have been particularly interested in facilitating collaborative enquiry among students. This emphasis has grown out of my scholarship, which examines knowledge as a commons – epistemic resources that are generated and governed by a community. But commoning – the act of creating and maintaining commons – involves the cultivation of specific epistemic virtues that are orientated towards communal work – such as humility, playfulness and courage. I was curious to know:
As a way of exploring this interest, I piloted an undergraduate module in International Education in which I set students the task of writing a Wikipedia article on an education topic from the global South that is absent or under-covered in Wikipedia. Examples of this include Quilombo schools set up by runaway slaves in Brazil, the anticolonial independent school movement in Kenya, and the educational writings of Rabindranath Tagore.
Many topics are missing from Wikipedia as a result of the raced, gendered and geopolitical inequalities of the internet. It is for this reason that writing Wikipedia articles on these topics is a valuable form of service learning, in which students have the opportunity to approach their learning in terms of its social ends, alongside its personal benefits.

Wiki-teaching is now a well-developed and well-documented method of teaching. There are rich examples of wiki-teaching in universities and schools from nearly one-hundred countries, ranging from Ghana to Scotland. Wiki-teaching allows students to get involved in creating content on Wikipedia, so that a successful course project has potentially millions of readers, and the feedback they receive from their peers and their lecturers is directed towards strengthening the project, rather than simply evaluating their abilities. As Wikimedia puts it, wiki-teaching is ‘The end of throwaway assignments and the beginning of real-world impact for student editors’.
In preparation for using Wikipedia in 2021, a group of us who were interested in Wikipedia-teaching at Sussex started meeting regularly in 2020. Various people have participated in this group, including those from the Arts and Humanities, Global Studies, Law, and Technology Enhanced Learning, as well as my own school – Education and Social Work. We have put together resources, discussed ideas for how to integrate Wikipedia in our teaching, and drawn on the resources from Wikimedia UK and the University of Edinburgh, which has pioneered the use of wiki-teaching in the UK. I have been very fortunate and been able to go back to the Sussex group as well as our Wikimedia focal point for further advice and support throughout the process.
The module has focused on scaffolding the task of writing a Wikipedia article as carefully as possible so as to ensure all students are able to produce a piece of work that they feel comfortable to publish if they choose to do so. The article was broken up into smaller tasks – choosing a topic, choosing key references, developing an annotated bibliography, and then writing a draft. I then randomly allocated their anonymised drafts to two other peers, who provided anonymous detailed written feedback and comments using the marking rubric. Following this, we had a peer assessment workshop composed of three parts:
After the workshop, students then revised and submitted their final drafts for a final assessment. Although this final assessment contributes to their year mark, I have worked to provide detailed comments so that they can also use this assessment to improve their article before publishing it.
Writing for Wikipedia also involves some technical skills. At the start of the module, I was very fortunate to have Dr Richard Nevell, a staff-member of Wikimedia UK, run an excellent workshop for my students regarding the structure of the Wikipedia environment, the nature of its governance model, and fundamental principles of Wiki writing, such as how to identify quality references, what constitutes neutral language, and the dynamics of collaborative editing. Now that the module has ended, students each have a well-researched draft Wikipedia article, which they can then choose to publish. To help them in this, Wikimedia UK are going to run a second workshop with them on how to publish the article.
Wiki-teaching is an excellent way of helping students to understand the collaborative nature of knowledge production. This is increasingly important in the 21st century, which relies far less on individual ‘genius’ and much more on collective deliberation, communal play and peer-based error correction. This is a vital characteristic of good citizenship, I think. It’s central, for example, to understanding that science is a collective noun and a verb rather than a single noun – this has been the difference between recognising the proper role of trial and error in the scientific community during Covid versus demanding immediate certitude from individual authorities and denouncing communal disagreement and trial and error as evidence of conspiracy.

Wiki-teaching also helps students to engage in debates about appropriate referencing and audience-specific registers. For example, academic essays have one kind of register, Wikipedia articles have another, and policy briefs yet another. Being able to move between these registers is a useful skill which I think will stand them in good stead, no matter what professional path they end up carving for themselves.
I am now moving towards introducing multilingualism in the classroom environment. Wikipedia is excellent for this, I think, because students can write assignments in whatever language is available on Wikipedia, and then translate this using machine translation (for example through Google translate). Besides being a lot of fun, this is also a great way of getting students in international education to understand that linguistic pluralism is an epistemic resource, rather than a problem to be solved.

I also want to think about group projects to generate featured articles for Wikipedia – these are articles that are considered to be of an excellent standard by the community and have undergone extensive review and vetting within the community.
Finally, I am also documenting the process and sharing this with the wiki teaching group at Sussex, so that we can consider how to roll this out more broadly. There are a lot of exciting possibilities to contribute in different ways, for example, by visualising datasets from a data science perspective, creating beautiful digital illustrations from an arts perspective, or participating in human and machine translation within the Wikipedia environment. The Library at Sussex has also been coordinating a fantastic series of Women in Red editathons aimed at addressing the small number of biographies on women and queer people in Wikipedia, and it would be brilliant to bring all our resources together into a communal effort.
It was fascinating and exciting to talk to Nimi about her successes and challenges teaching with Wikipedia last term. In the Technology Enhanced Learning team, with Nimi’s case study, Richard Nevell’s experience and the support of other academics, we are developing a deeper understanding of how Wikipedia can be used in teaching, learning and assessment. Nimi and Richard will be giving a workshop (with support from us) about her experience later in the year. We do hope you can join us and let us know if you would like to try to use Wikipedia as an authentic assessment tool in your own teaching and we will be delighted to support you in any way we can. For further help with innovative assessment design, please contact TEL at TEL@sussex.ac.uk
