Whilst we all want to use engaging multimedia within our teaching it’s always good to be aware of copyright on such media. How can we find media to use that doesn’t put us afoul of potential copyright law I hear you ask?
Well, thankfully there are a number of online resources that can do the work for you, providing rich libraries of multimedia content that comes under Creative Commons (CC) or other free for educational use licences. If you’re looking for images then please see our excellent previous blog post: Free images to use in presentations and Canvas.
Video
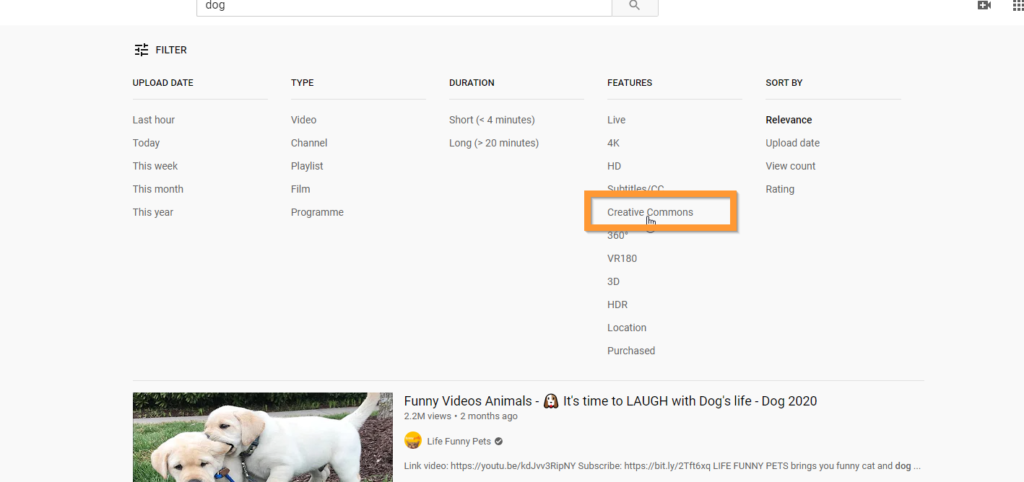
screenshot of CC search in YouTube
YouTube. The worlds biggest and grandest video sharing platform actually has the ability to search for Creative Commons video do this simply search for a term on YouTube, then click the Filter button and select Creative Commons, this will then filter the results to display only CC videos.
Vimeo is another popular video sharing platform that features the ability to filter for CC videos. You can find CC videos by either searching for a term and then filtering for the appropriate licence or you can browse the Vimeo Creative Commons collection.
Freesound contains a fantastic collection of audio files. Some of these are songs or music, others are sound effects or recorded sounds from a wide variety of sources. The search feature isn’t as great as some larger sites and may require some more work but there is a vast collection of material.
Free Music Archive contains a fine collection of free music licensed under Creative Commons, there’s a wide range of genres covered with music to suit most needs.
BBC Sound Effects. The BBC has licensed part of their decade-spanning sound effect archive for free educational and personal use, including over 16,000 effects. A rich and fascinating resource to explore.
MusOpen. If you want royalty free classical music for any purpose then MusOpen has you covered, with thousands of recordings of classic pieces from Bach to Schubert.
3D Modelling
The 3D Models CCO site set up by an individual hosts a brilliant collection of 3D models licensed under a CC0 licence meaning they are all free to use.
Further information
You can learn more about Creative Commons at creativecommons.org and the Sussex Library has a LibGuide on copyright with lots of important information. If you would like to discuss options for using multimedia in your online teaching please contact tel@sussex.ac.uk.
By the time that students have graduated from university, they will have completed a number of modules in order to obtain their degree. For each module they will usually have produced study notes, completed one or more pieces of work and received feedback on their assessments. These learning artefacts can be considered a portfolio of work showcasing a student’s academic and professional progression. It can be useful for students to return to this ‘portfolio’ after their studies to demonstrate various achievements throughout their university life.
The Careers and Employability Centre can advise students on producing these portfolios, but academic tutors can help with this too, particularly as the perception of portfolios continues to expand beyond an employability enhancement tool to embrace the idea of portfolios as an authentic, meaningful and student-centred form of teaching and learning.
Many tutors at Sussex are successfully using portfolios in their modules, either utilising our institutional digital platform Mahara or using other appropriate software. However, in light of increasing evidence for the pedagogical benefits of portfolio (Scully, O’Leary and Brown, 2018), we would still like to see a rise in the uptake of its use in teaching and assessment at Sussex. In order to achieve this aim, members of the Technology Enhanced Learning team will be developing support and guidance. To get a clearer idea of what tutors want in relation to portfolio support, we have created a questionnaire for all Sussex teaching staff to complete.
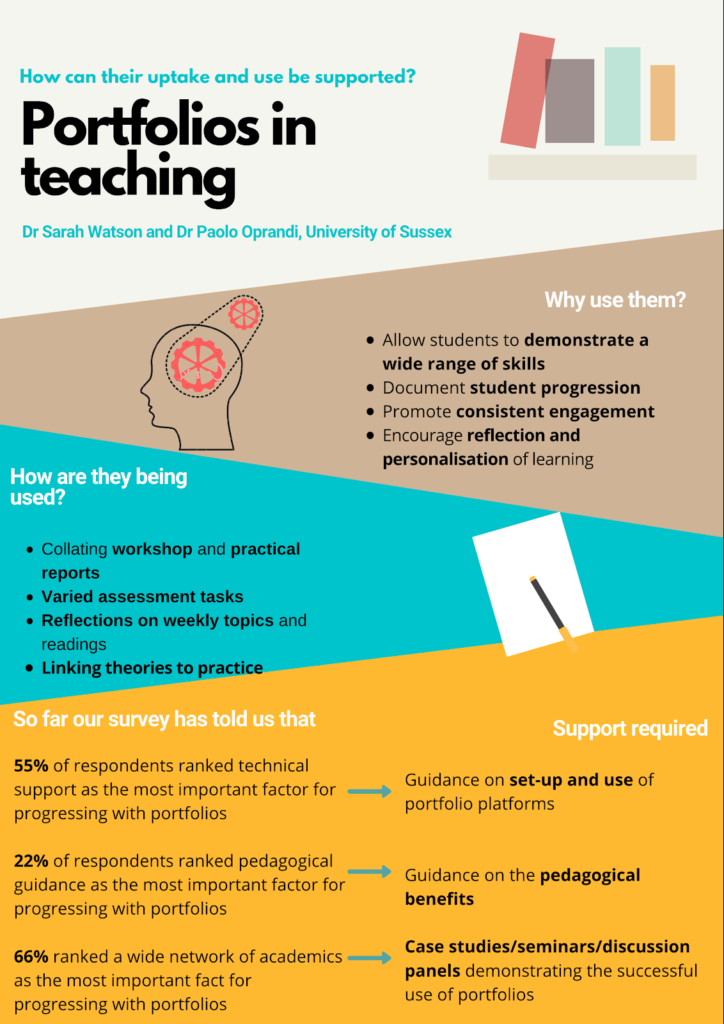
Here is a summary of our preliminary findings so far.
So far many tutors have shared their views on the value of portfolios. Many have found that portfolios have increased the inclusivity of assessments.
“Bringing diversity into the forms in which we assess students’ learning enhances inclusivity and provides empowering grounds for students to discover their learning skills and abilities.”
Marianela Barrios Aquino (International Relations)
“[Portfolios] can be a cumulative set of tasks that can be submitted over a term – meaning that students don’t have to submit just one big piece of work at the end that may be rushed.”
Liam Berriman (Social Work)
“[Portfolios] play to the diversity of students’ strengths”
Rachel Burr (Education)
“[portfolios can include]…creative reflection or video clips or something that you may not want to be the whole assessment can be used alongside other things to give students the maximum opportunity to demonstrate their skills.”
Emily Danvers (Education)
Many have related the importance of portfolios in ensuring students are engaged from the beginning to the end of the term through the portfolio linking activities directly to the assessment.
“Unlike essays, you will not be able to concentrate on just a few selected topics. Instead you should try to create links between the different elements of the module and to think carefully about the underlying meanings, connections and relationships between the texts with which you are dealing.”
Grace Carswell (Geography)
“[Portfolios] ensure consistent engagement with all aspects of a module through a teaching semester”
Simon Rycroft (Geography)
Others have noted how the tutor and the students themselves use the portfolio to track their progress. In one of Liam Berriman’s modules, the tutor and the students give feedback on parts of the portfolio over the term. Not only does this provide the opportunity for students to receive feedback, it also gives the tutor feedback on the academic progression of their students and offers insight into where students may need more support.
From responses to questions about what could help tutors develop their portfolio practice, three key requirements have started to surface:
Technical support
A wider network of staff using portfolio and sharing best practices
Training (for both students and staff) on the pedagogical benefits of portfolios
Our brains are buzzing with ideas generated from the survey results so far as we start to plan our portfolio provision at Sussex. From our survey it is clear that technological and pedagogical principles go hand in hand, and that the digital platform tutors choose has to be fit for purpose and utilized in the right way to support teaching aims. With this in mind, it is our intention to run workshops that focus both on developing technical and pedagogical competencies surrounding the use of portfolios. Alongside these workshops, we would like to present a number of case studies where portfolios have been successfully implemented within teaching modules. These case studies may also form a panel discussion, whereby tutors using portfolios can discuss the strengths and potential pitfalls of this learning tool and thereby disseminate their knowledge and experience to fellow colleagues throughout the University of Sussex.
These ideas are still in the developmental phase as we haven’t finished collecting feedback and our survey is still ongoing. If you have not yet completed our survey, please complete our questionnaire to have your say.
References
Scully, D., O’Leary, M. & Brown, M. (2018). The Learning Portfolio in Higher Education: A Game of Snakes and Ladders. Dublin: Dublin City University, Centre for Assessment Research, Policy & Practice in Education (CARPE) and National Institute for Digital Learning (NIDL).
Peer learning is a term that covers a broad spectrum of activities in which students work together to further their learning, from peer teaching, to group working, to peer assessment. There are great benefits to be seen from peer learning approaches. Students can be given opportunities to organise their thoughts through discussion with coursemates. Thinking critically about the work of others can help a student to reevaluate their own work. It can also reduce the focus on the tutor allowing you to observe and assess progress or understanding.
So how can peer learning strategies be implemented in Canvas?
Canvas Discussions
Discussions can be used in a variety of ways to encourage peer learning. You might follow up a live or pre-recorded lecture with a Canvas Discussion to allow students to carry on talking about the topic. It’s a good idea to post one or two initial open questions to focus conversation. Alternatively, post a stimulus such as an image or passage from a text for students to reply with their interpretations. Students can then build on each others’ responses. Discussions can also be used for peer review type activities with students posting their work for comment. Though do note it is not possible for these to be made anonymous.
Asking students to co-create or to work together to critique a document is beneficial both for the students but also for you as a tutor. For example, giving students a document to work on in a breakout room provides another way to check that students are on task.
Canvas has Canvas Collaborations for creating shared Office 365 or Google documents however you may find it simpler to jump straight to Office 365 and link to your document from your Canvas module. It is quick and easy to create and share a word document that can be edited by anyone at the University with the link. In addition you can specify that students can only review, so that comments, changes and additions are clearer to see.
Alternatively you can give students access to edit a Canvas page. In the settings for a page under ‘Users allowed to edit this page’ select ‘Teachers and Students’. Canvas provides a student guide for editing a page.
Canvas groups
Many students will form their own mutual support networks outside of the University suite of tools, however there are options to foster this within Canvas as well. Canvas groups provide a student controlled space where they are able to share files, create discussions and collaborate with other students.
Using the default Canvas Assignment submission tool for formative assignments you have the option to redistribute submissions for peer assessment. This can be done manually or you can select a required number of submissions to be reviewed by each student once the deadline has passed.
Students can complain that they are performing a role that should be done by the tutor so it’s important to consider how you frame the peer assessment making sure its benefits are clear.
If you’ve found other successful peer learning strategies using Canvas or other apps we’d love to hear more about it.
As always if you have any questions or thoughts about the ideas covered above, please email tel@sussex.ac.uk.
This post aims to provide some quick tips and tricks to help improve student engagement during online teaching sessions. We understand that group sizes mean different things to different people, a small group in one discipline may be considered a large group in another, but try to take a look through the prompts below and see what may work in your teaching context.
Small groups
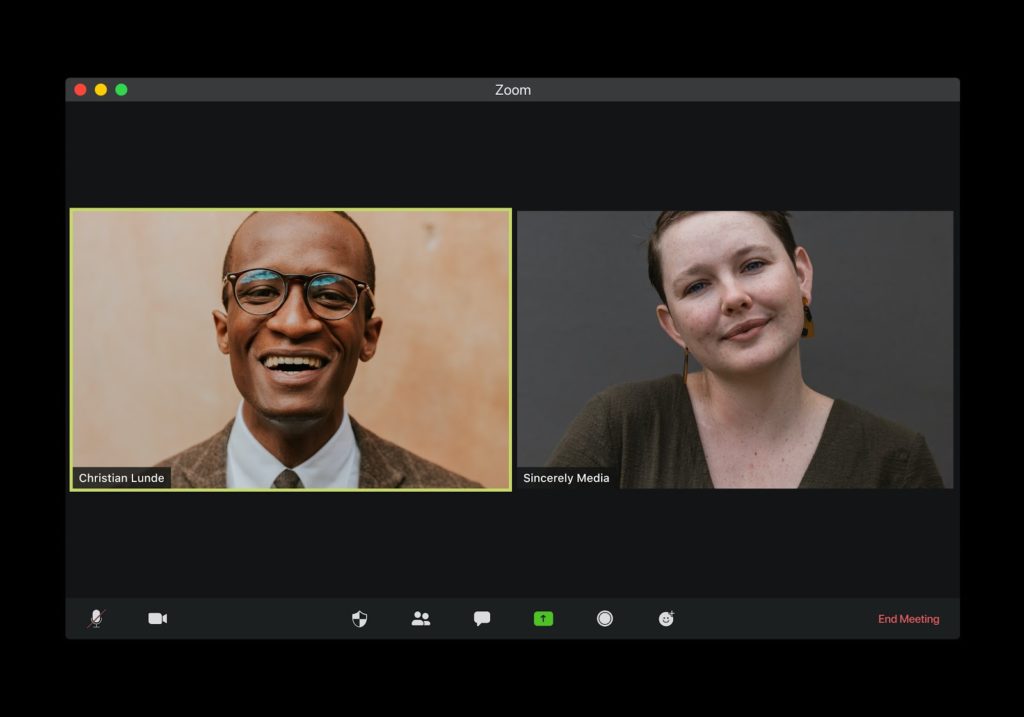
Firstly encourage students to engage by using the microphones and turning on their webcams. It can be difficult to get students to enable their cameras, and we definitely don’t want to force students to turn them on for a number of reasons, but try to encourage this as a normalised behaviour for your class and emphasise the benefits – both that you get from seeing them and that they get from seeing each other.
In a smaller group it’s also a lot easier to ask students to contribute verbally and the raise hand feature in Zoom can be really useful to facilitate this and avoid students feeling like they have been talked over or haven’t had a chance to contribute. Remember to mention ‘mic etiquette’ to your students to ensure that they mute themselves when they are not contributing (and remember to unmute themselves when they want to speak!).
As students could potentially be feeling more isolated at this time it’s a great idea to include icebreaker activities at the start of your teaching sessions. This could be a planned activity, perhaps a short gamified quiz using tools like Poll Everywhere or Kahoot!, but it doesn’t have to be and doesn’t need to take too much time away from the module content. Your ‘icebreaker’ could just be a chance for you to check in with your students to see how their week has been going and to provide a more personal touch.
Another way of allowing students to participate more actively in a teaching session is to hand over the Zoom screen sharing capabilities to them. In the same way that hosts can, participants have the ability to share their screen with the rest of the group. There are a number of ways that you could use this, for example for more formal student presentations or to allow students to feed back on the output of an activity they have been working on. You can even ask multiple students to share their screens simultaneously.
One tool that can be really useful to help break up these large groups and allow students to interact more with their peers is the breakout room feature in Zoom. This allows you to split students into smaller groups in a number of ways to allow them to carry out activities or engage in discussions, providing them with a greater opportunity to participate actively and to engage with other students. The post Encouraging engagement in breakout room activities takes you through a number of strategies that you can put in place before, during and after each activity to try to encourage students to engage with and make the most of these breakout rooms.
When teaching large groups it is important to manage the Zoom Chat carefully as it could get very busy. You may want to define set times that you will be addressing questions so that you don’t feel like you have to stop the flow of the session whenever a message comes in and so that students know that their question or issue will get addressed. In addition, you could collect questions before a teaching session via a Discussion in your Canvas module. This will allow you to identify possible themes beforehand and then use these to feed into the direction of the session.
Student response systems can also be really useful in large group teaching sessions. These are tools that allow you to gather opinions and feedback from students or to pose quiz questions. To do this you could use either the Zoom polls, which allow you to pose multiple choice questions, or Poll Everywhere, which allows you to use a wider range of question types including word clouds, open ended questions and clickable images. These activities allow you to embed points of interaction throughout your teaching session to ensure that students are actively participating.
Further support
Please contact tel@sussex.ac.uk if you would like any further support with the tips mentioned about or if you would like to explore any of the tools further. You can also visit the Teaching Online, Learning Anywhere for additional guidance.
Zoom breakout rooms can be a great way of facilitating interaction between students during online teaching sessions. They can be particularly useful when teaching large groups, when the possibility of student contributions is more limited. However, there is a danger that these rooms can become silent spaces where students are not actually interacting and when we aren’t able to circulate around a room to check on student progress this can be difficult to monitor and mitigate.
Below are a series of practical tips for setting up and facilitating breakout room activities. We have split these into what you can do before, during and after an activity to provide students with the knowledge they need to make the most of this opportunity to interact with their peers.
Before
Make sure to set out the activity instructions and timings clearly. What is the purpose of the activity? What will students need to produce or communicate back? How long will they be spending on it? It is a good idea to include this information on any slides or resources you are using so that it is as clear as possible to students what is expected of them. You should also provide direct links to any resources that students will be required to use so that they don’t need to spend the time allocated for the activity looking for these. These resources might include any articles, case studies or collaborative documents they will need to access. The easiest way of doing this is through the Chat within Zoom.
Before sending students into their breakout rooms, check that they understand what is required and allow some time for them to ask questions about the activity. You can also take this opportunity to remind them of the ‘Ask for help’ button within their breakout room. This allows them to indicate to you that they have a question or are stuck and call you into their room.
Finally allocate your students to their groups. There are a number of different ways you can do this, you can assign groups randomly, allow students to self select into groups or you can set up groups in advance by pre-assigning them. Think about what will work best for the activity you have prepared and bear in mind that allowing students to self select their groups may take more time out of the session.
During
Once students have joined their breakout rooms you can use the tools within Zoom to check on student progress. Instead of circulating around the room, as you would when teaching in person, you can drop into each room to see how they are getting on with the assigned activity, encourage further discussion and check that they are on task. It may be a good idea to let students know you will be doing this beforehand as this will hopefully encourage them to start interacting. You can also use this time to respond to any requests for help that you receive.
Consider requiring students to contribute to a collaborative resource, for example a shared Office 365 document or a Padlet wall. This requires students to create some kind of output during the activity, hopefully encouraging them to engage. It also makes feeding back to the whole group quicker, particularly for larger cohorts, and provides students with a resource they can take away at the end of the session.
Don’t forget that you can broadcast messages to students while they are in their breakout rooms. You could use this feature to send reminders of timing, for example that they have two minutes left or that they should think about moving on to the second half of the activity or a second discussion question.
After
Once students have returned from their breakout rooms you should require them to feedback into the session, this provides more of a purpose to the activity as students can see how it feeds into the wider teaching session. There are a number of ways that you could capture this. Firstly, you can ask students to report back verbally, this could be a nominated member of the group or all students within a group. Secondly, you can ask them to post a summary in the Chat and then read this aloud to share with the whole cohort. Finally, you could do this by looking through the contributions that the groups have made to a collaborative resource. This approach is particularly useful for large groups when asking each group to report back verbally would be very time consuming. Once you have done this aim to then sum up the key points from the activity.
Get in touch
Don’t forget that breakout rooms aren’t the only way of encouraging student interaction online and won’t necessarily be the best approach for every activity, there are many other options to explore. If you would like support using breakout rooms or other learning technologies within your teaching please visit the Teaching Online, Learning Anywhere support site or contact tel@sussex.ac.uk. We’re happy to run through any ideas that you have for different activities and to help you think through how to redesign in person activities for online teaching.
Images can add so much to a presentation or a Canvas site, to illustrate a point, supplement your words or grab viewers’ attention. But where can you find good images that don’t breach copyright?
Too many people just use a Google search to find an image and think that if it’s on the internet it’s okay to use – it’s not. Most images you will find using internet image searches are copyrighted.
It is possible to modify a Google or Flickr search to show just the images that have Creative Commons licences but there are other options. There are many sites that bring together images that are free to use, either using their own licences or CC0 (Creative Commons No Rights Reserved). Often these images will be mixed with some paid-for images to tempt you, but you can search just for the free images.
Some of our favourite sites
The image at the top of this post is from Unsplash for education which is one of our favourites, alongside Pixabay and Pexels (now both owned by Canva, the graphic design platform). Between them they have millions of images so you are likely to find something that communicates what you want.
You may also want to look at these sites which have a mixture of images including some CC0 images:
There are also many more specialized sites that curate collections of images around particular topics or themes or from particular sources.
Rawpixel public domain contains images of ‘antique books and chromolithographic plates’ alongside photos which might be particularly useful for arts and humanities.
Art museums and libraries are also great sources, with lots of great quality, free to use images if you search for CC0 or ‘public domain’. For example, you might want to look at:
If you are looking for clipart and logos without any background you might like PurePNG or Clip Safari. The Noun Project has some public domain icons amongst many CC-licensed ones, including a recent collection Redefining women icons.
Abstract concepts can be harder to find images for than concrete objects, but often the process of finding an image that represents what you want to say helps in thinking about it, so asking students to find a free or CC-licensed image that represents a particular concept could be a useful activity. In the process, students can learn about searching for free-to-use images and how to reference them when required.
One platform which can be useful for not only finding images, but also showing how a CC-licensed image should be referenced is Photos for Class which searches Flickr, Pixabay and Pexels for Creative Commons images then embeds the citation into the image as in the example below. As the name implies these are images intended for schools, so a filter is applied to surface only age appropriate images for K-12 which may mean that you won’t always find what you want, but it’s a good way to show how a Creative Commons licensed image should be referenced (unless it’s CC0).
Further considerations and resources
Don’t forget that whatever images you use, it is essential to add alt-text for accessibility.The Digital Accessibility toolkit on the Technology Enhanced Learning web pages has lots of guidance on making all your digital materials accessible.
Thankyou for reading this EE blog post this is representative at the time it was written.
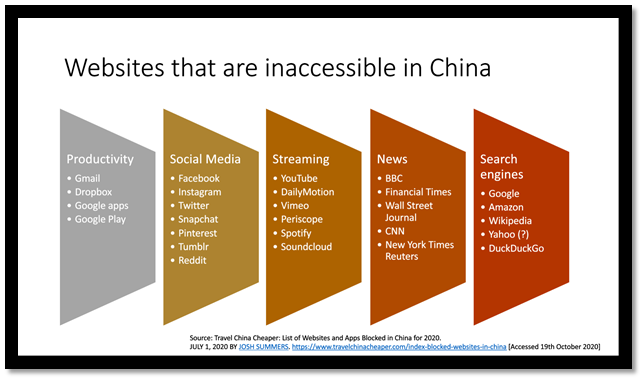
In the current climate of travel restrictions, shielding and limits to student numbers on campus, the student body is much more dispersed than in previous years. This has brought with it new challenges in providing for the significant number of our students resident in China. Due to local regulations, many commonly used websites, tools, apps and information sources are blocked for people on the Chinese mainland (China’s Special Administrative Regions such as Hong Kong and Macau are not affected). This has an implication for our students who are currently studying there and needing to access online teaching content. In this post with support from our colleague Sarah Ison, we will list some of the most common and popular sites and information sources that are currently blocked by the Chinese firewall and some sites that we rely on for teaching which are available to our students there. We’ll also look at what you can do to limit the impact of these restrictions and ensure the best learning experience for all of our students.
Sites that are unavailable
A large number of the websites that we all use on a daily basis are blocked. Perhaps the most significant for many is YouTube, but the list includes the full Google suite of collaborative apps as well as services from Facebook, Spotify, Wikipedia, Box.com, and a host of popular news sites.
Fortunately, however, the University has a core set of tools which are available.
Software and services that are available in China
Canvas, Talis Aspire, Panopto and Turnitin
These sites all work from China, so students should be able to engage fully in their online learning and submit their assignments, but there may be slower upload or download times using these. It would be advisable to check through resources or readings in your online reading list to see if you are linking to news articles or websites that are currently unavailable (please see our list below, or for further detail on this china travel website which is updated regularly). If you are linking to a resource which is not available in China, the library can provide support in finding an alternative.
Zoom
Zoom is also known to work well for students in China. As with those working closer to home, students in China may still experience different connection speeds, so account for this in your planning and be understanding if they turn off their webcams.
Microsoft Office 365
The full Office 365 package works in China, including OneDrive (students may experience slow uploads), Teams*, Outlook and the software applications. Students could be encouraged to use OneDrive for sharing and collaboration rather than Google docs if group work is required for teaching and you know that some of your students could be in China. It is also a useful reminder to students that they can download Office 365 for free, including the Office Suite applications and use them on up to 5 computers and 5 mobile devices. Full information is available on the ITS Office 365 guidance page.
Other tools
The picture becomes less clear with tools like Padlet and PollEverywhere, however we have had reports from colleagues that these are largely available.
If you are keen to use a particular web-based tool you could try using a checking website like comparitech.com. This will give you a good idea if something definitely won’t work, however where you receive a positive result, we would still advise treating this with caution. Students may still experience slow download speeds or access may vary.
What can you do?
Use the core university tools
As mentioned already the core set of university tools are known to be accessible to our students in China so sticking to these is a safe bet.
Allow time
Allowing extra time for synchronous activities and providing resources in advance gives students time to overcome any access issues prior to the session. Running asynchronous activities can also help to account for websites which are slow to load and with time zone differences.
Group work
Group work helps to mitigate some access issues, for example grouping students in breakout rooms via Zoom and asking one student to summarise the group’s response reduces the need for any one student to be able to access a particular resource.
Ask your students
Even with the measures mentioned above the picture may vary between cohorts so the best way to get a clear idea of what will work is to ask your students and be willing, where necessary, to provide an alternative.
If you have any other questions about making your teaching work for everyone, please contact tel@sussex.ac.uk.
Student presentations are beneficial to student learning. For example:
They engage students in the learning material and encourage them to be active in learning the topic they are presenting on.
They develop professional and transferable skills.
They give students ownership of their learning.
Preparation for a presentation requires students to decide what they want to say and in doing so they must be selective of the materials and theories they are learning. This develops their critical thinking skills.
The experience of giving presentations grows the students’ feeling of expertise and therefore sense of belonging to the discipline.
Group presentations have additional benefits. The knowledge we disseminate during taught sessions becomes learnt at a deeper level by the students as they prepare for the presentation. They require students to work together which is an important transferable skill and they develop their communication skills using disciplinary-based language. The more they talk, the more they analyse the topic. I could go on.
However, there is at least one downside to traditional, in class, student presentations.They take up valuable seminar time and the quality of the presentations can be variable, therefore not making the best use of face-to-face contact time with your students.
How to do group presentations online
One upside of the current pandemic is that it has forced us to rethink the norm. Many of us using group presentations have thought about ways in which we can bring them to the blended learning environment. In doing so, we have realised the value in students doing a presentation in their own time and submitting a recording of it. This provides the opportunity for maximising the use of face-to-face teaching time for other tasks that the tutor leads.
Our recommendation is that students do group presentations together in a recorded Zoom meeting started in their Sussex Zoom account. They can create the slides together and share the screen when presenting. The tutor and other students can attend but do not need to be there.
All Zoom meeting recordings are transferred to Panopto so the student that has hosted the Zoom meeting will find it in the “Meeting recordings” folder in their Panopto “My folder”. The host will need to move the recording to a Panopto Assignments folder created by the tutor and would need to submit it on behalf of the group to a Canvas Assignment.
Depending on how you have set up the Group Assignment you can grade and leave feedback on the student contributions individually or as a group. You can use the SpeedGrader functionality but you can also use the Panopto Discussion feature to add comments at certain points during the presentation recording. If you wish the presentation to be peer reviewed you can allow peer review in the Assignment settings.
We are the Educational Enhancement team at the University of Sussex. We publish posts each fortnight about the use of technology to support teaching and learning. Read more about us.