Thankyou for reading this EE blog post this is representative at the time it was written.
Over this summer the University of Sussex Business School embarked on a project to co-create new marking criteria for assessments within their courses. This project saw students, academics and professional services staff come together to collaborate on and produce a common set of criteria and descriptors that were accessible to students.
The project aimed to address differential criteria in place across departments, ensure quality assurance by anchoring the revised criteria to the national standards for each level of study, and address NSS scores and feedback from students. This feedback had highlighted the need to create a consistent set of criteria that used accessible language in order to allow students to engage with the assessment and feedback process. When asked why having a clear criteria was important from a staff and student perspective students answered:
To be able to understand what is expected.
Transparency.
Motivates students and gives directions for improvement and developing potential.
Less ambiguity and misunderstandings.
This project employed a number of Student Connectors both from within the Business School and from other academic schools who provided insight into the students perspective and experience.
A set of generic criteria is important to provide students with consistency, however it was important that this was able to be adapted for individual assessments to allow for variation in assessments and to ensure that students receive individualised feedback. Each level has been created as Turnitin and Canvas rubrics which staff can apply to their assessments and then adapt as needed, providing additional contextual information for students. Technology Enhanced Learning are running workshops for University of Sussex Business School staff to provide guidance on using the school marking criteria and providing effective feedback – book a place. If you would like to find out more about this project please contact tel@sussex.ac.uk.
We all know that trying to focus on someone speaking for long periods can be very draining, more so when we are increasingly holding digital meetings where a plethora of distractions lurk behind every browser tab (the rise of the digital world appears to have decreased our already fragile attention spans), so in a situation such as this how can you ensure that you keep your students’ eyes and minds engaged and focused on your teaching and their own learning?
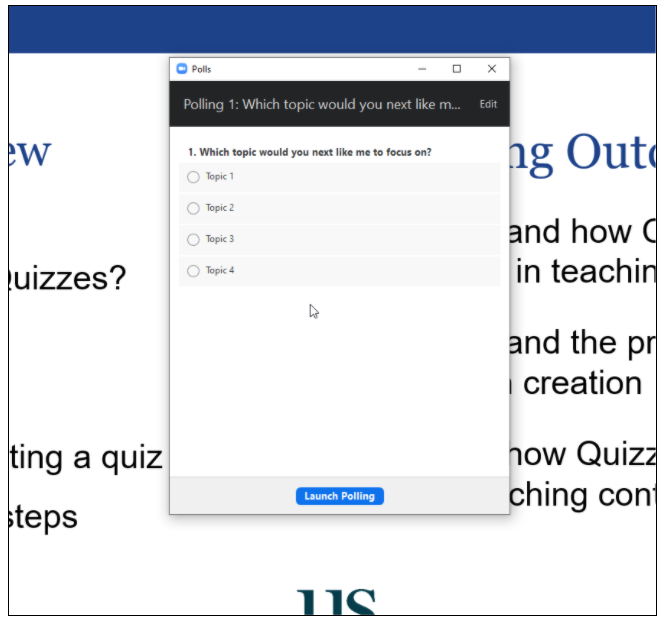
Polls
Zoom has the ability to pose questions to participants at any point through the Poll tool which allows you to pose multiple choice question/s to your students. You can use this to poll students on how they are finding the current session or what topic they’d like to cover next.
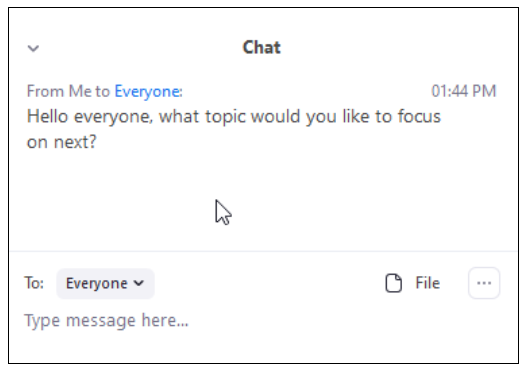
Ask students to put suggestions or ideas to a topic within the chat, even if you can’t respond to all the responses due to a large cohort size or time constraints you can respond to a few responses and build on them, just the fact that your getting students to think about the question your asking them and formulating a response through typing will increase engagement and attention.
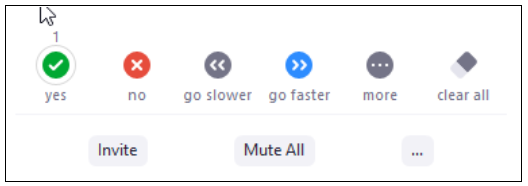
Non-verbal feedback
Probably the easiest way for students to interact with just a click of a button is for them to use the non-verbal feedback tools within Zoom. This allows students to choose an icon that will appear next to their name within the Participants menu within Zoom. Even with large cohort sizes this makes it very easy to quickly get some clear feedback from students.
You can use this to have regular check-ins with your students to assess their understanding and comprehension of the topic at hand, if they need a break or to see if you should adjust the pace of your session.
It may also be good as a way to engage students who feel too shy or anxious about typing a response into the chat.
The whiteboard functionality in Zoom allows you to display a whiteboard onto the screen which students can write, draw on and annotate, this can allow for a bit of informal engagement, getting students to write out a response or even draw a response to a certain question or prompt onto the whiteboard. See Zoom’s guidance on whiteboards for more information
If you’d like help with any of the features of Zoom or any of the other technologies we support then please contact Technology Enhanced Learning at tel@sussex.ac.uk
Tutors want to divide up students for a range of purposes, from the administrative to the creative. Canvas has two tools for this which work in distinct ways providing lots of opportunities, but sometimes causing some confusion. This post will explain how Sections and Groups work and offer some ideas for how you might use them.
What are Sections and Groups in Canvas?
Sections are created automatically from the data in Sussex Direct and divide students into teaching and assessment groupings so that e-submissions can be managed. Each Canvas module site will contain a number of these sections and extra ones may be created during the year for things such as resits. Although Sections are created largely for administrative purposes they can then be used to manage some activities within a module.
Canvas Groups are not created automatically and should be thought of as primarily student-led spaces within and alongside a module. When Groups are created within a module, each group has its own group space, like a mini-module within which students can work together. Once Groups have been created, by tutors or students, they can be used to manage some activities.
How can you use Sections to facilitate online learning?
Sections are primarily used to manage e-submissions and marking. If you want to create a formative assignment for one or more seminar groups you can choose which section(s) you assign it to.
When it comes to marking you can filter by sections if you need to mark a particular seminar group’s work. There is guidance on this on the TEL website, see e-Submission and e-Feedback: Guidance for staff.
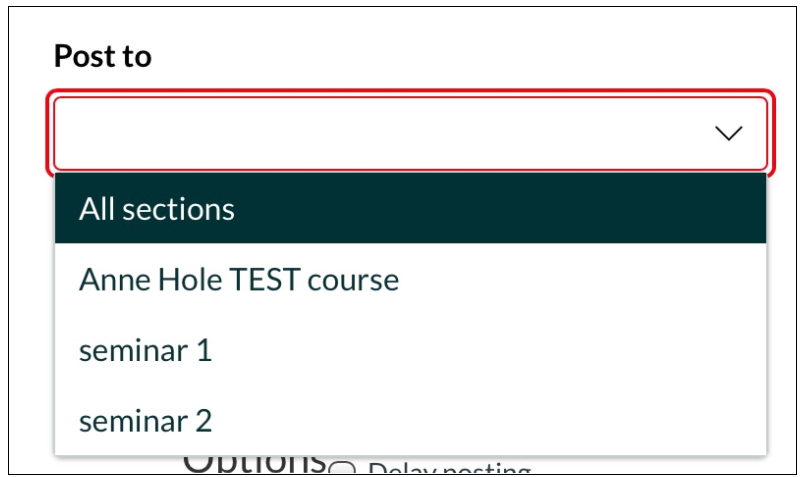
You can also use Sections to create Announcements and Discussions that are visible only to selected Sections. This would be useful for sharing a Zoom link for an online seminar or setting up a pre- or post-class Discussion. For either of these activities just choose the Sections you want in the ‘Post to’ field when creating your Announcement or Discussion.
If you want all the students to discuss the same topic, but only with others in their seminar Section you can duplicate a Discussion and post each copy to a different Section.
How can Canvas Groups be used in online learning?
When staff or students set up a Group in Canvas a separate mini-module is created which can be accessed either within the module or from a student’s Groups item in the global navigation menu. The group space is controlled by its members so it is more a peer collaborative space than a ‘teaching’ space. You can read more about Groups in Canvas Highlights – Groups.
If Groups have been set up in a module, they can also be used in other activities such as Assignments and Discussions. When creating a formative assignment you can choose to make it a ‘group assignment’ so that one member can submit for the whole group. This could be useful for students submitting group presentation slides or for an asynchronous version of a small group seminar activity.
Setting a Discussion as a Group Discussion will create multiple instances of the same discussion topic, with each student only seeing their own group’s version, but the tutor having access to all of them. This could be a good asynchronous online alternative to the sort of small group discussions you may have in a face-to-face seminar.
Guidance and support for Sussex staff
The Technology Enhanced Learning team are running webinars on this topic as part of the current programme of workshops and there are lots of useful guides on topics such as constructing collaborative activities, setting up online assignments and building communities online in the Teaching Online Learning Anywhere site. You can also email us at tel@sussex.ac.uk to discuss how you might use these, or any other Canvas tools in your teaching.
Autumn term is fast approaching and with the move to planning for online delivery first, many people are thinking about pre-recording short video presentations to use in their teaching. Here are some tips to make these engaging, accessible and reduce the need to reproduce them year on year.
When designing for online, it’s more important than ever to make sure our resources are accessible to all students. Typical issues include insufficient colour contrast between text and the background, and unreadably small font sizes.
The University of Sussex provides a recommended template which uses accessible colour combinations. Do remember, the content you add to your slides must also be accessible.
It is good practice to add alternative text for images in your slide deck. While alt text is not visible to students in video presentations, it is still important if you are providing your slides separately to students.
Pre-recorded videos must have subtitles
From 23rd September this year (2020) all pre-recorded video must include subtitles. In Panopto you will need to manually add the Automatic Speech Recognition (ASR) captions.
With this reliance on ASR captions, good quality audio becomes all the more important. One way to improve audio is to use an external microphone positioned close to you. I’ve used a lavalier microphone clipped to my chest. If buying a mic, make sure your computer has the relevant ports to support your chosen model.
Avoid reference to specific term dates
It can take time to produce a good video so the more reusable your video the better. You may want to refer to an assignment deadline but doing so can reduce the longevity of your video. Instead, refer students to the relevant assignments screen in your module.
Avoid displaying full link text on-slide
Links to resources and websites, like course dates are prone to change (and without additional effort, students can’t click a link in a video). It is better to refer students to a reading list or embed the video in a Canvas page and include the links to resources below it.
Use licensed or rights-free images
Use of images can greatly enhance the interest of a presentation but it’s important you only use images for which you have licence.
Ensure that all images included in your presentations are either licenced, or rights free and provide the appropriate attribution. Creative Commons Search makes it easy to find rights free images and helpfully provide the attribution for you but there are many other sites too.
Making changes to recordings
Where you do need to make changes to a recording don’t jump to re-record the whole video. Our video hosting platform, Panopto, has some useful functions for making corrections.
If you cough or are interrupted while recording, don’t worry, repeat the last sentence and you can edit out the first take once the video is recorded.
Add additional clips
If you get to the end of a video then realise you’ve missed a vital piece of information all is not lost. Panopto will allow you to edit in additional videos where you need.
Support from TEL
If you need any further support with creating video presentations, see our guidance on the Teaching Online, Learning Anywhere site, or contact tel@sussex.ac.uk.
Active learning is an approach to teaching and learning that requires students to take an active approach to learning material by analysing the topic and producing something tangible. It is different from passive learning which involves listening and reading but does not immediately require the students to produce anything from their learning.
Active learning generally requires students to produce something on their own or most commonly with student peers. Online tools have a number of advantages because the thing that students create is accessible across devices and can be shared easily with each other and the tutors. Furthermore online tools have obvious benefits when all or some of the students are engaging remotely. Active learning activities can be set for students to do before a class, during class and/or after a class.
The following online tools are all recommended for active learning activities.
Online documents include OneDrive and Google Drive. All Sussex students and staff have one Terabyte of space on OneDrive. The service is supported by ITS. An alternative option is Google Drive and all staff and students have unlimited space on Google with the G-suite for Education. Please note that Google Drive is not supported by ITS so students will not receive the same level of support. In order to use shared documents you will need to set up one or more shared documents (text, slides or spreadsheet), set the availability of the documents so they are editable by students and share the link.
Online post-it note applications include Padlet. Sussex has an institutional account so please register by contacting tel@sussex.ac.uk. In order to use Padlet you will need to decide the format of the Padlet wall you wish students to contribute to, create one or more walls, set the wall privacy to “secret” so they are editable by students with the link and share the wall address with them or embed it in a Canvas Page. See previous posts where we have written about Padlet.
Online discussions can be set up in Canvas. They can allow students to upload files, insert ‘video, audio, images, and links. Discussions can be configured so students need to contribute before they see the contributions of their peers and leave each other threaded comments.
Canvas also has a Module Chat feature. To use it we recommend you set a time when the chat will take place, set the topic that you will be covering and be prepared with questions for the students. Communicate this information during face-to-face teaching sessions and Canvas announcements.
Active learning activities may also require students to submit work to the tutor via an online drop box, such as the Canvas assignment. This can be set up so that students submit in groups. The kind of work they submit might be anything including a video of themselves presenting. Students can use Panopto or any other recording application to record video including their phone camera. The Canvas Assignment can also allow students to peer assess each other.
The key steps common to whatever tool you use are the following:
You communicate clearly the expectations that you have of students to complete the task.
References to the active learning activity are made before the task (during lectures and so on), and after the activity. Ensure the students’ contributions are recognised and valued, and the importance of engagement to their learning is emphasised.
The ground rules for the task are set, particularly if this is a task which requires students to collaborate. In these cases, the ground rules might specify that students are inclusive, respectful and constructive.
There is clarity amongst students how to access the tool and when the output from the active learning activity is due.
Technology Enhanced Learning recently hosted a webinar which aimed to share a range of simple but powerful approaches to combining face to face and online teaching. The session featured five contributors from across the different academic Schools who shared examples, drawn from their own disciplinary area, of how we might enable students studying online to join and participate in an in-person teaching session.
In this blog post Kitty Horne, Learning Technologist, and Sarah Watson, one of the University’s recently appointed Academic Developers, share a summary of the event.
Dr Jessica Horst: Setting expectations for the students
Jessica reminded us that clear communication is paramount as we enter into the fertile, yet relatively uncharted, territory of combined face to face and online teaching. She explained how this will help students feel more in control of their studies and reduce the number of recurring questions via email. Jessica highlighted the following communication tools:
Canvas Announcements facilitate a transparent form of communication, as those enrolled on a module can revisit posts at any time and use the search function to find specific content. Canvas Announcements also allow tutors to schedule posts in advance, meaning messages are released in a timely manner to optimise enthusiasm and engagement for the course. For more information on how to utilize Canvas Announcements, see Canvas Know-how 2: Making Use of Announcements.
Canvas Discussions enables online class conversations and, just like face to face discussions, these need structure and guidance from the tutor. These conversations should be structured around specific teaching groups or topics in order to avoid an overflowing inbox and help students find relevant information. For more information on how to utilize Canvas Discussions, see Canvas highlights 7: Discussions.
These communication tools can be used to explain to students what to expect from each session, such as the teaching methods used and the activities involved. Where possible, information should be concise so as not to overwhelm students.
Jessica ended her talk by reminding us that strong communication channels are equally important between teaching staff within the University and she urged her colleagues to find out how others are teaching and what tools they are using. There is a great deal of innovative teaching happening at Sussex and, despite working remotely, it would be wonderful to maintain an open and collegial atmosphere where best practice can be shared.
Professor Mary Krell: The BC in BC-IC-AC (before class, in class, after class)
Mary opened her talk with a reassuring reminder that we don’t have to reinvent the wheel when combining face to face and online teaching. Teaching staff at Sussex already deliver module content in ways that can be easily transposed onto this new way of working.
Reflecting on her BC-IC-AC (before class, in class and after class) approach, Mary explained how important the BC is within blended learning. Mary sets her students tasks to undertake before class, such as readings, collaborative projects and fieldwork, to engage students with the material before the session. Chiming with Jessica’s message, Mary perceived the BC aspect as an opportunity to explain to students what to expect in class. Again, this ability to manage expectations was stressed as a key factor to ensuring student satisfaction.
Susan Smith: Utilising your students to help you when teaching solo
Susan’s talk addressed the very valid concern of multitasking in the combined face to face and online sessions. She asked, how do we keep on track of what we’re teaching, while interacting with both the students physically in front of us and those studying online?
Susan suggested appointing a student as a notetaker and, in advance, sending them a template of the session so that they had a clear understanding of what the session would cover and therefore what needed to be recorded. These notes could be utilised by students unable to attend a live session. Susan would also ensure the chat box was monitored by another student, who would group questions/queries and feed these back at appropriate points within the session.
Utilising her students in this way, Susan promotes a collaborative atmosphere within her sessions that breaks down hierarchical structures between tutor and student, whilst generating a community between those studying in person and those studying online. For more information on building online learning communities, please visit the Building Online Learning Communities section of the Teaching Online, Learning Anywhere Canvas site.
Dr Mark Paget: Polling for engagement
Mark started off his talk by advising staff to keep things simple and not try to use many different technologies at once. This avoids sessions becoming overcomplicated for both you and your students allowing them to concentrate on subject content. One technology that Mark recommended making use of was Poll Everywhere, an online polling and quizzing tool which the University has a licence for and that can be integrated into PowerPoint presentations. Poll Everywhere can be used to add interactivity into sessions by posing a variety of question types to students including multiple choice questions, word clouds and clickable images.
Mark suggested creating activities to check students’ understanding of different concepts, for example by running a short quiz on a specific topic. Poll Everywhere can also be used to gather feedback from students which can be used to generate a post session response. Mark mentioned a couple of alternative tools which could be used such as the polling tool within Zoom, though this has limited functionality in comparison to Poll Everywhere, and the online collaboration tool Padlet. Mark also stressed the importance of introducing these interactive activities to students, particularly for those who will be joining online.
Dr Graeme Pedlingham: Facilitating collaboration and discussion with collaborative software
Graeme focussed on how we can facilitate shared discussions between students in different locations. As others mentioned, key to setting up these activities is the importance of providing instructions and access to resources early on so that students are aware of what they will be doing and what is expected of them. Graeme suggested using Microsoft Word Online, a tool included in Sussex students’ Office 365 accounts, to create a collaborative artefact during discussion based activities. Word Online allows a number of individuals to collaborate in real time within a single shared document.
Small group discussions can be facilitated in the classroom as well as online by using Zoom breakout rooms. The Word document could then be shared on the Smartboard, for students with the classroom, and via a link for students joining online, with students contributing verbally or with written contributions to feedback the thoughts and ideas that they had during their small group discussions. This collaborative document would be a record of their thoughts which can be returned to as a resource for asynchronous learning and for revision. This approach would hopefully foster a greater sense of ownership for the students. For more information about creating collaborative activities, please visit the How to construct collaborative activities section of the Teaching Online, Learning Anywhere Canvas site.
Podcasts are increasingly popular and many people are keen to adopt and adapt the medium for education. A previous post on this blog looked at ways that you can power up your pedagogy with podcasts but it may be that you don’t want a formal podcast, just one or more audio recordings that students can listen to when and where they want.
This post will outline how Panopto and Zoom can be used with Canvas tools to share audio recordings with students.
Audio in Canvas Pages, Discussions or Announcements
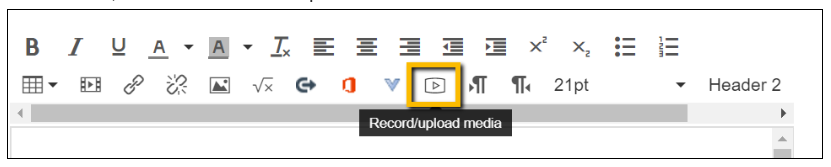
The Rich Content Editor (RCE) in Canvas allows you to add media recordings (video or audio) to anywhere it is used. This would be useful for short recordings that you wanted to add to a Discussion or Announcement, for example. Recordings made directly into Canvas in this way cannot be edited, which is why this method is best used for short informal recordings.
In the RCE, select the Record/upload media icon.
You can then either record straight into Canvas or upload a recording you have already made.
Solo podcasting with Panopto
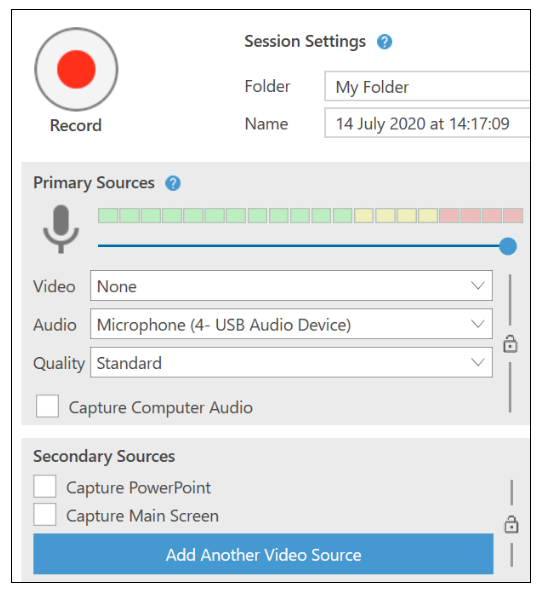
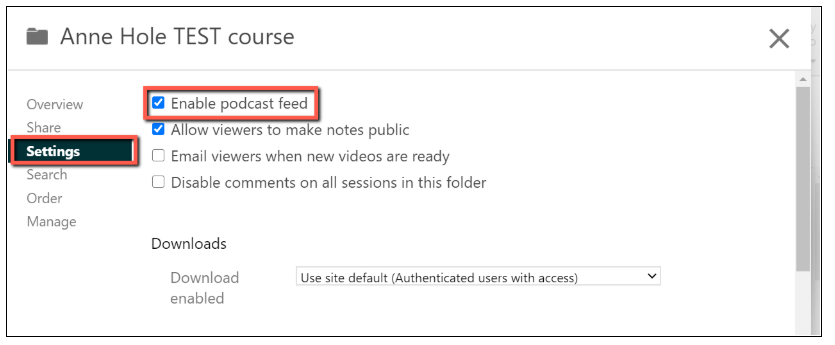
For a more substantial recording by a single speaker, for example a module convenor introducing a topic, then Panopto can be used to record audio only. Recordings can then be shared just as lecture videos are, in Canvas. If you don’t want your recording available to students as soon as it has processed, choose ‘My Folder’ before you start recording.
To record audio only via Panopto, turn off the video and secondary sources (screen, slides) when starting your recording and only the audio will be captured.
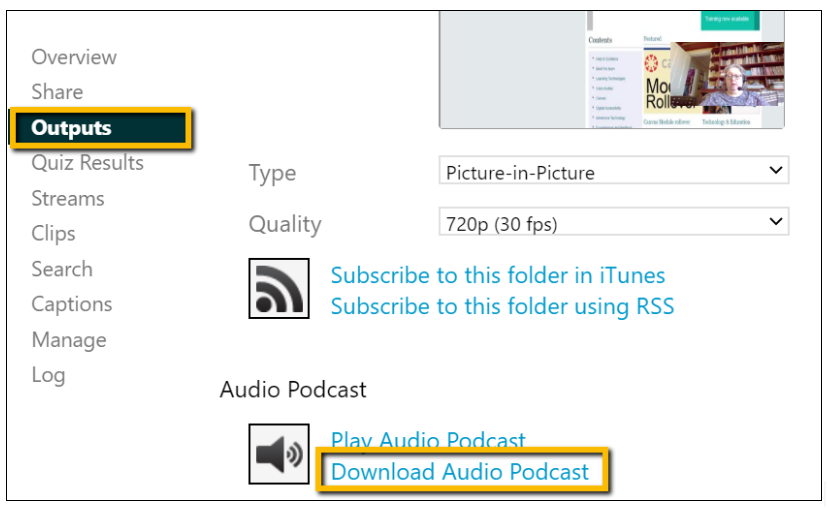
If you forget to turn off the video, or have an old recording that you want to extract the audio from, you can download just the audio from Panopto and add it to Canvas as shown above. Go to the settings for the recording, choose Outputs and Download Audio Podcast.
Interviews and conversations with Zoom
An interview with an external expert, or a conversation between members of a teaching team could make a great addition to a module. For a multi-speaker recording, Zoom will be a good option.
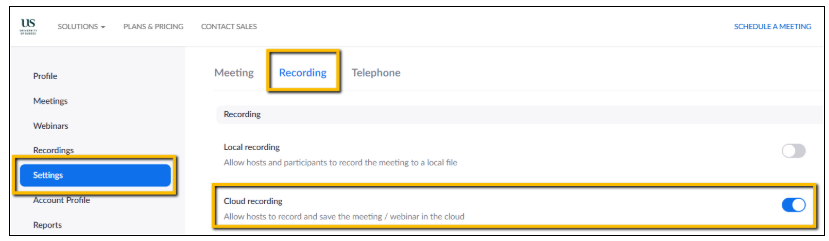
When setting up your Zoom meeting in your account at https://universityofsussex.zoom.us/ check that it is set to record the meeting to the cloud.
When you start your meeting, make sure that everyone’s video is turned off in order to only record the audio.
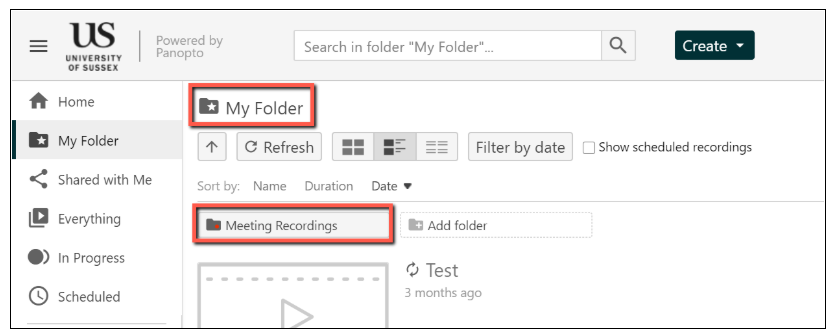
After your ‘meeting’ the recording will be processed and uploaded to your ‘My Folder’ in Panopto, in a sub-folder called ‘Meeting Recordings’.
Editing and sharing
While your Panopto recording is in your ‘My Folder’ you may want to trim the start and finish (see Focus on Panopto: Editing recordings) and add a meaningful title and description before sharing it with students.
Captions
You may also want to add closed captions. A recording made in Panopto has the option of having Automatic Speech Recognition captions added (see Focus on Panopto: adding ASR captions) and Zoom recordings will automatically have captions added as the recording is processed.
Sharing via Canvas
You will then want to share your recording with your students. To do this you can move the recording to the Panopto folder for a particular module. You may also want to embed the recording in a Page so that you can add some context and related files. Moving and sharing options are outlined in our previous post: Focus on Panopto: Sharing recordings.
Mobile downloads
To make your Panopto recordings more like a podcast you may want your students to be able to download them on their mobile devices to listen to wherever they are. This can be done in the Panopto folder settings.
Padlet is a great tool that allows for a number of synchronous and asynchronous online teaching opportunities, here are 4 fantastic uses for Padlet as part of online teaching and learning:
Backchannel and Q/A space
Sharing resources
Group work
Introductory space / Social space
Backchannel and Q&A space
One use for a Padlet is to use it as a backchannel for a module. Share the Padlet with students and let them know it’s an area for them to post ideas and questions. This can be a good alternative to using Canvas Discussions as students can post questions anonymously on Padlet which may encourage them to post more often.
You aren’t limited to just using text to reply to student questions on Padlet,. You could post a video or voice recording of yourself answering the question which will allow students to feel more connected and establish more of a personal connection with you. Padlet’s ability to showcase a range of posts at once on a wall also then enables students to easily see previously answered questions.
Sharing resources
You can post a wide range of multimedia to Padlet, this can make it a great area to post resources and materials from videos to images to documents to audio files. If you’ve got a resource you want to share with your students chances are you can post it to a Padlet wall. The added benefit is that students can also post any useful resources they come across to share them with the whole class.
Here is an example of a Padlet used as an area to collate resources.
Do you have students working on group projects together? Then why not get them set up with their own Padlet wall (students can have their own Padlet back accounts created by TEL on request from tutors) as an area to work collaboratively. They can post messages, share resources and collaborative documents. This can then also serve as a space for them to exhibit their finished group project to tutors or other students.
Padlet can also work for more short term group work, for example if you are holding a group teaching session on Zoom and you’ve broken students up into breakout rooms then you could ask for each group to post their group’s thoughts or notes onto Padlet, this way you capture all your students thoughts and allow them to be easily shared with other groups.
Padlet can also be used as a social space for your modules allowing students to connect with each other. For example at the start of a module a Padlet could be created for students and staff to introduce themselves through video, text, audio or other media. You could ask every student to create a short video recording introducing themselves, other students then have the option to reply to each other and form a social connection.
Not all of the functions in Padlet are fully accessible, though this is something they are working on (see Accessibility and Padlet). When using Padlet you should consider whether you need to provide alternatives or modify the activity to allow everyone to take part. If you know that students are using screen-reading software to access internet content, or relying on keyboard input to navigate computer resources (i.e. do not use a mouse), you should consider alternate ways to include these students in the planned activity. Care should also be taken that wallpaper and colour schemes used in Padlet do not disadvantage students who are partially-sighted or have a colour vision deficiency.
You can read more about using Padlet at Sussex on the TEL website and in these previous posts about Padlet:
The Technology Enhanced Learning team (TEL) are always happy to support staff getting started with Padlet or thinking about how it might be useful for their students’ learning. Contact us at tel@sussex.ac.uk.
Thankyou for reading this EE blog post. This post is representative of the time it was written.
We are the Educational Enhancement team at the University of Sussex. We publish posts each fortnight about the use of technology to support teaching and learning. Read more about us.


 We all know that trying to focus on someone speaking for long periods can be very draining, more so when we are increasingly holding digital meetings where a plethora of distractions lurk behind every browser tab (the rise of the digital world